As a design writer seeking a one-handed writing solution for myself, I expected to research and test various adaptive options, settle on one best suited to my needs, and then write about it. But as my search progressed, to my great surprise, I came to realize that it would be easier, faster, cheaper, and better all around to design a custom solution.
 Previously, we explored various assistive writing technologies, including one-handed keyboards. Next, we’ll go over how you (or anyone else!) can duplicate my one-handed keymap and deploy it on your own (compatible Windows) computer — it’s free and easy to set up in a matter of minutes. This article covers the design process in between, through which I mapped out layers of functionality to enable single-handed touch-typing on a two-handed QWERTY board.
 I dubbed this system the KURTY Single-Handed Half-Board Keymap — which can be shorthanded to KURTY (you know, like QWERTY!). Before we launch into that design process, let’s take a brief look at the finalized keymap and its functionality. It might seem a bit backward to start at the end, but sometimes a path is easier to follow if we see where it’s leading!
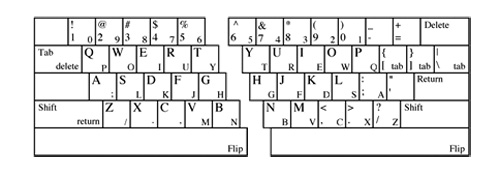
KURTY Single-Handed Half-Board Keymap
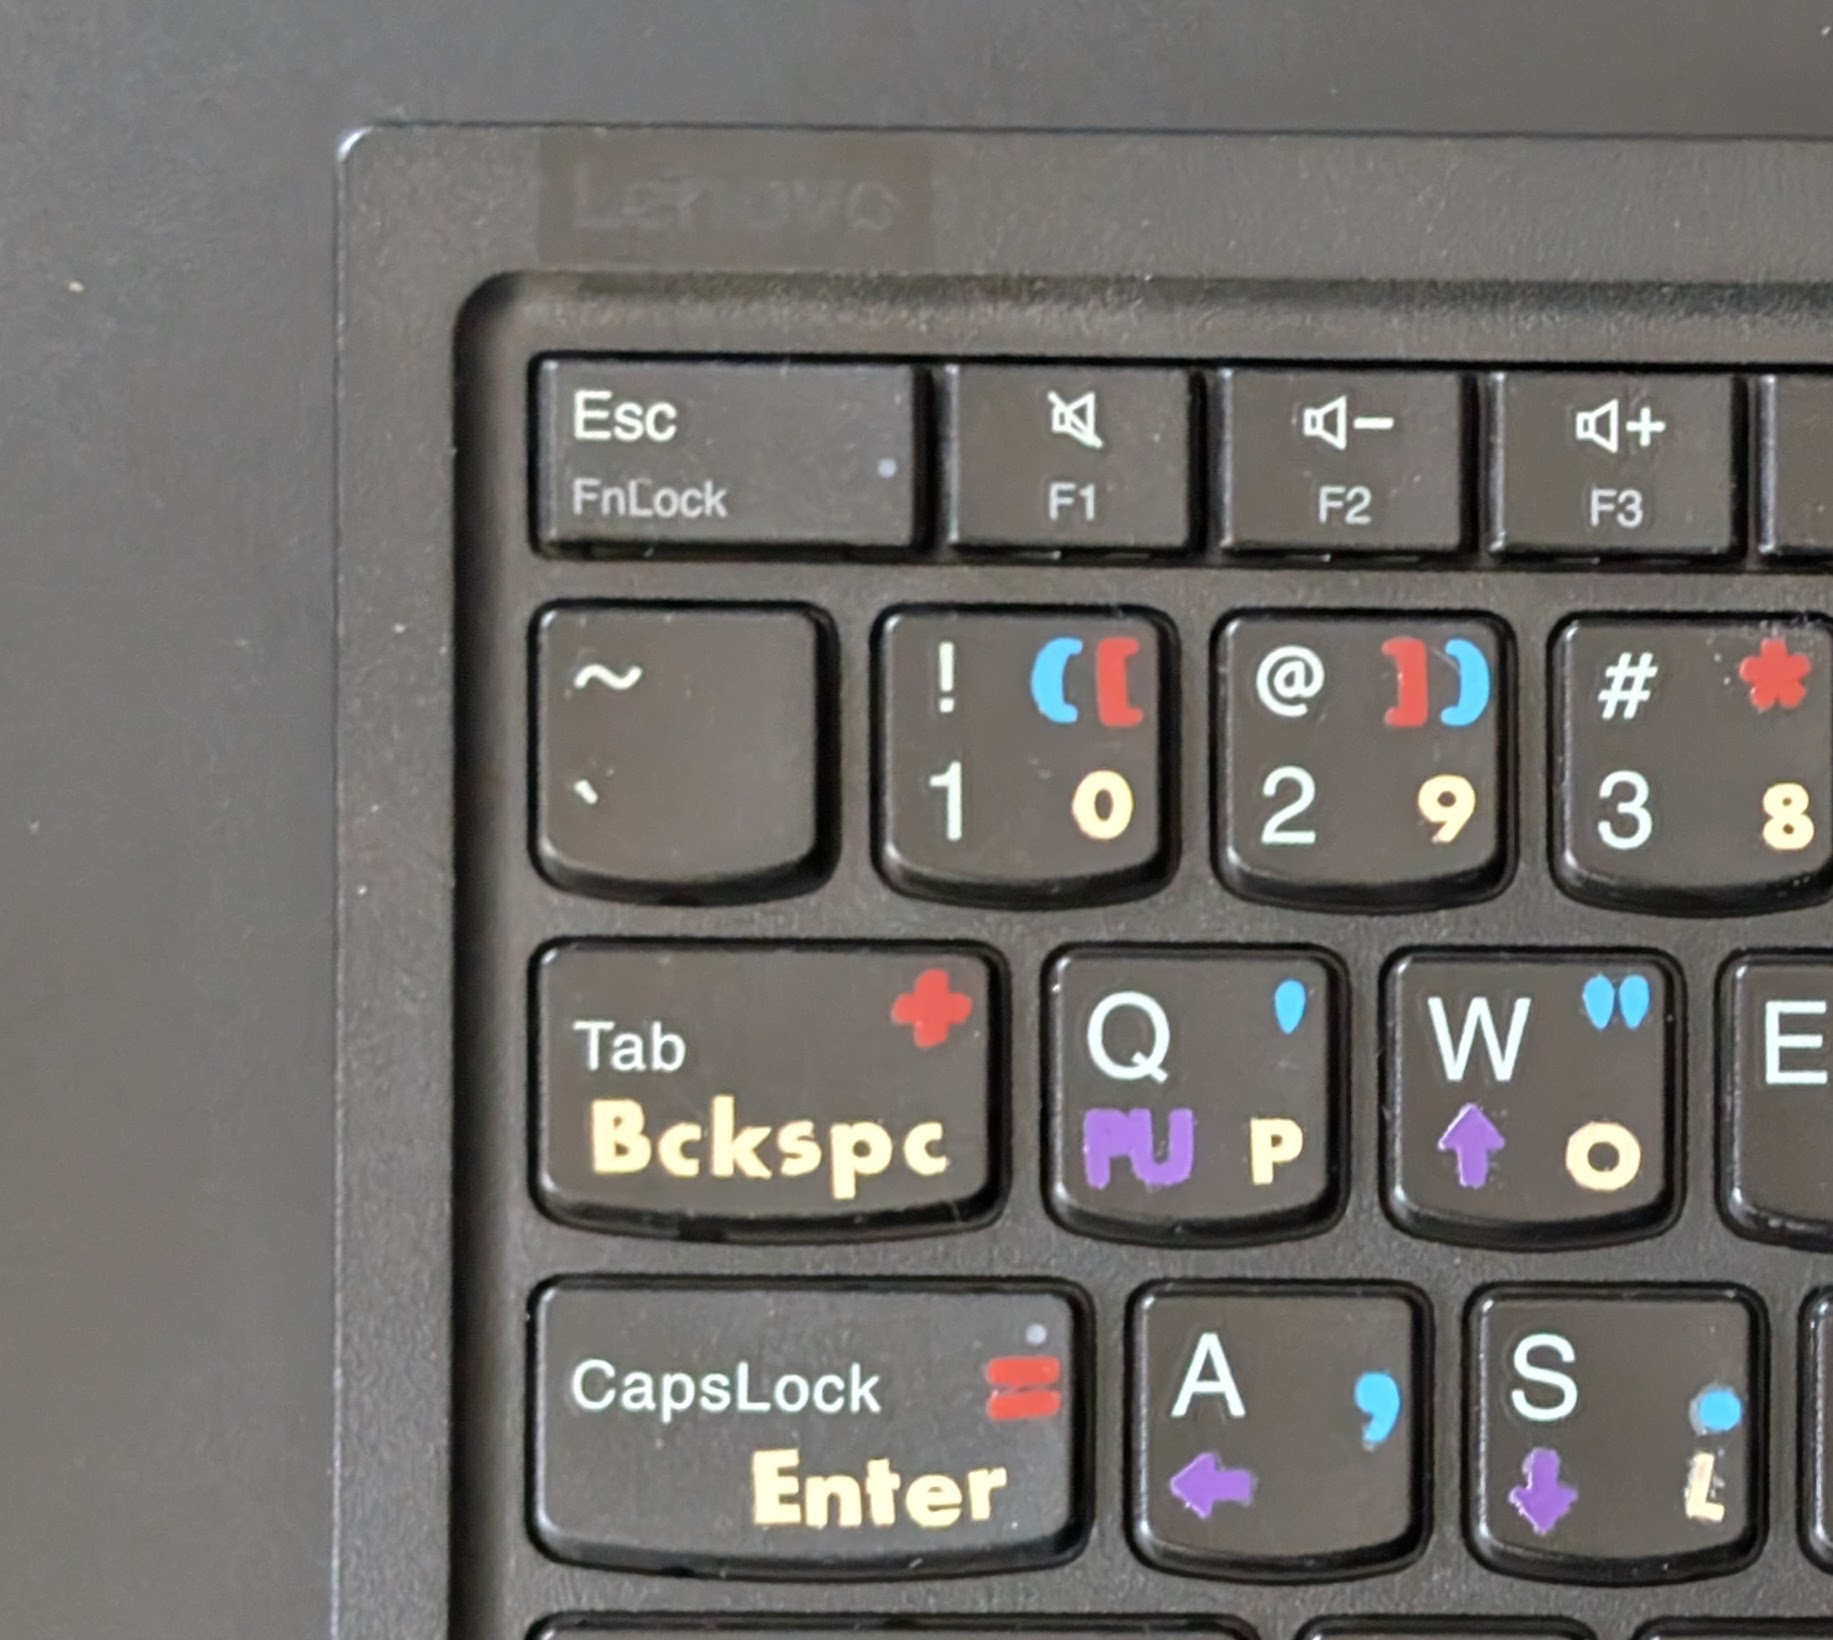
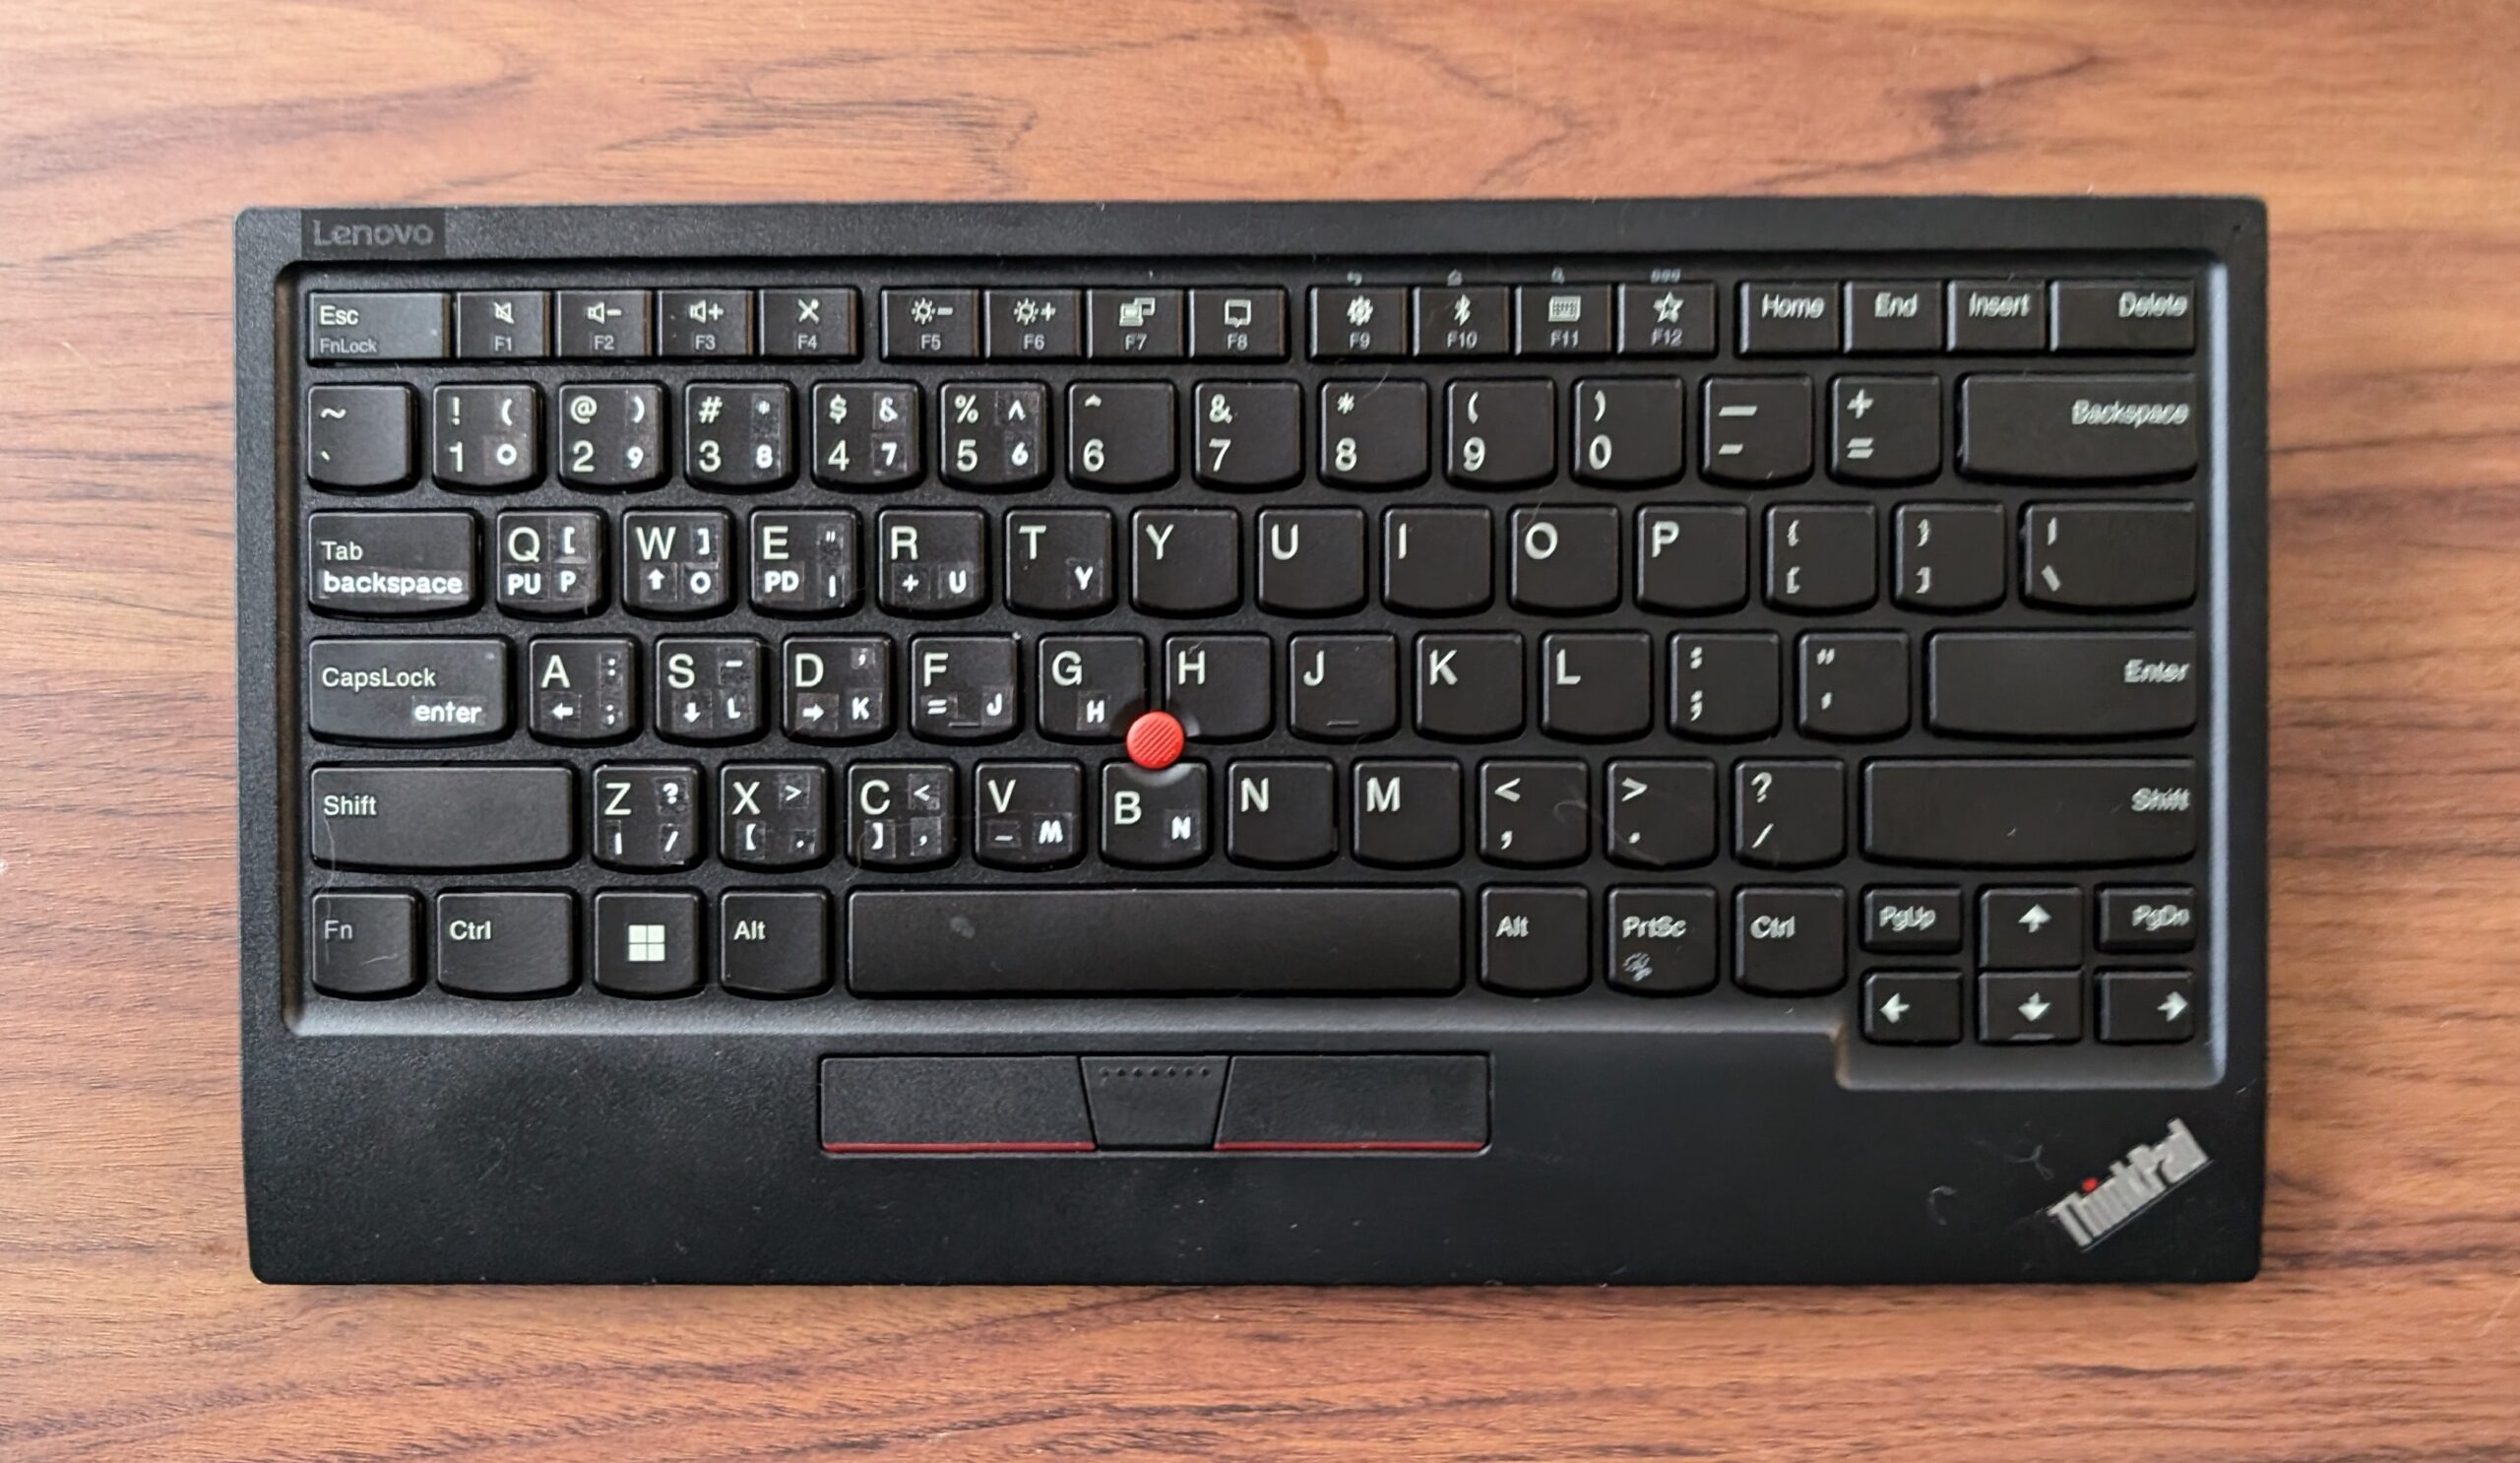
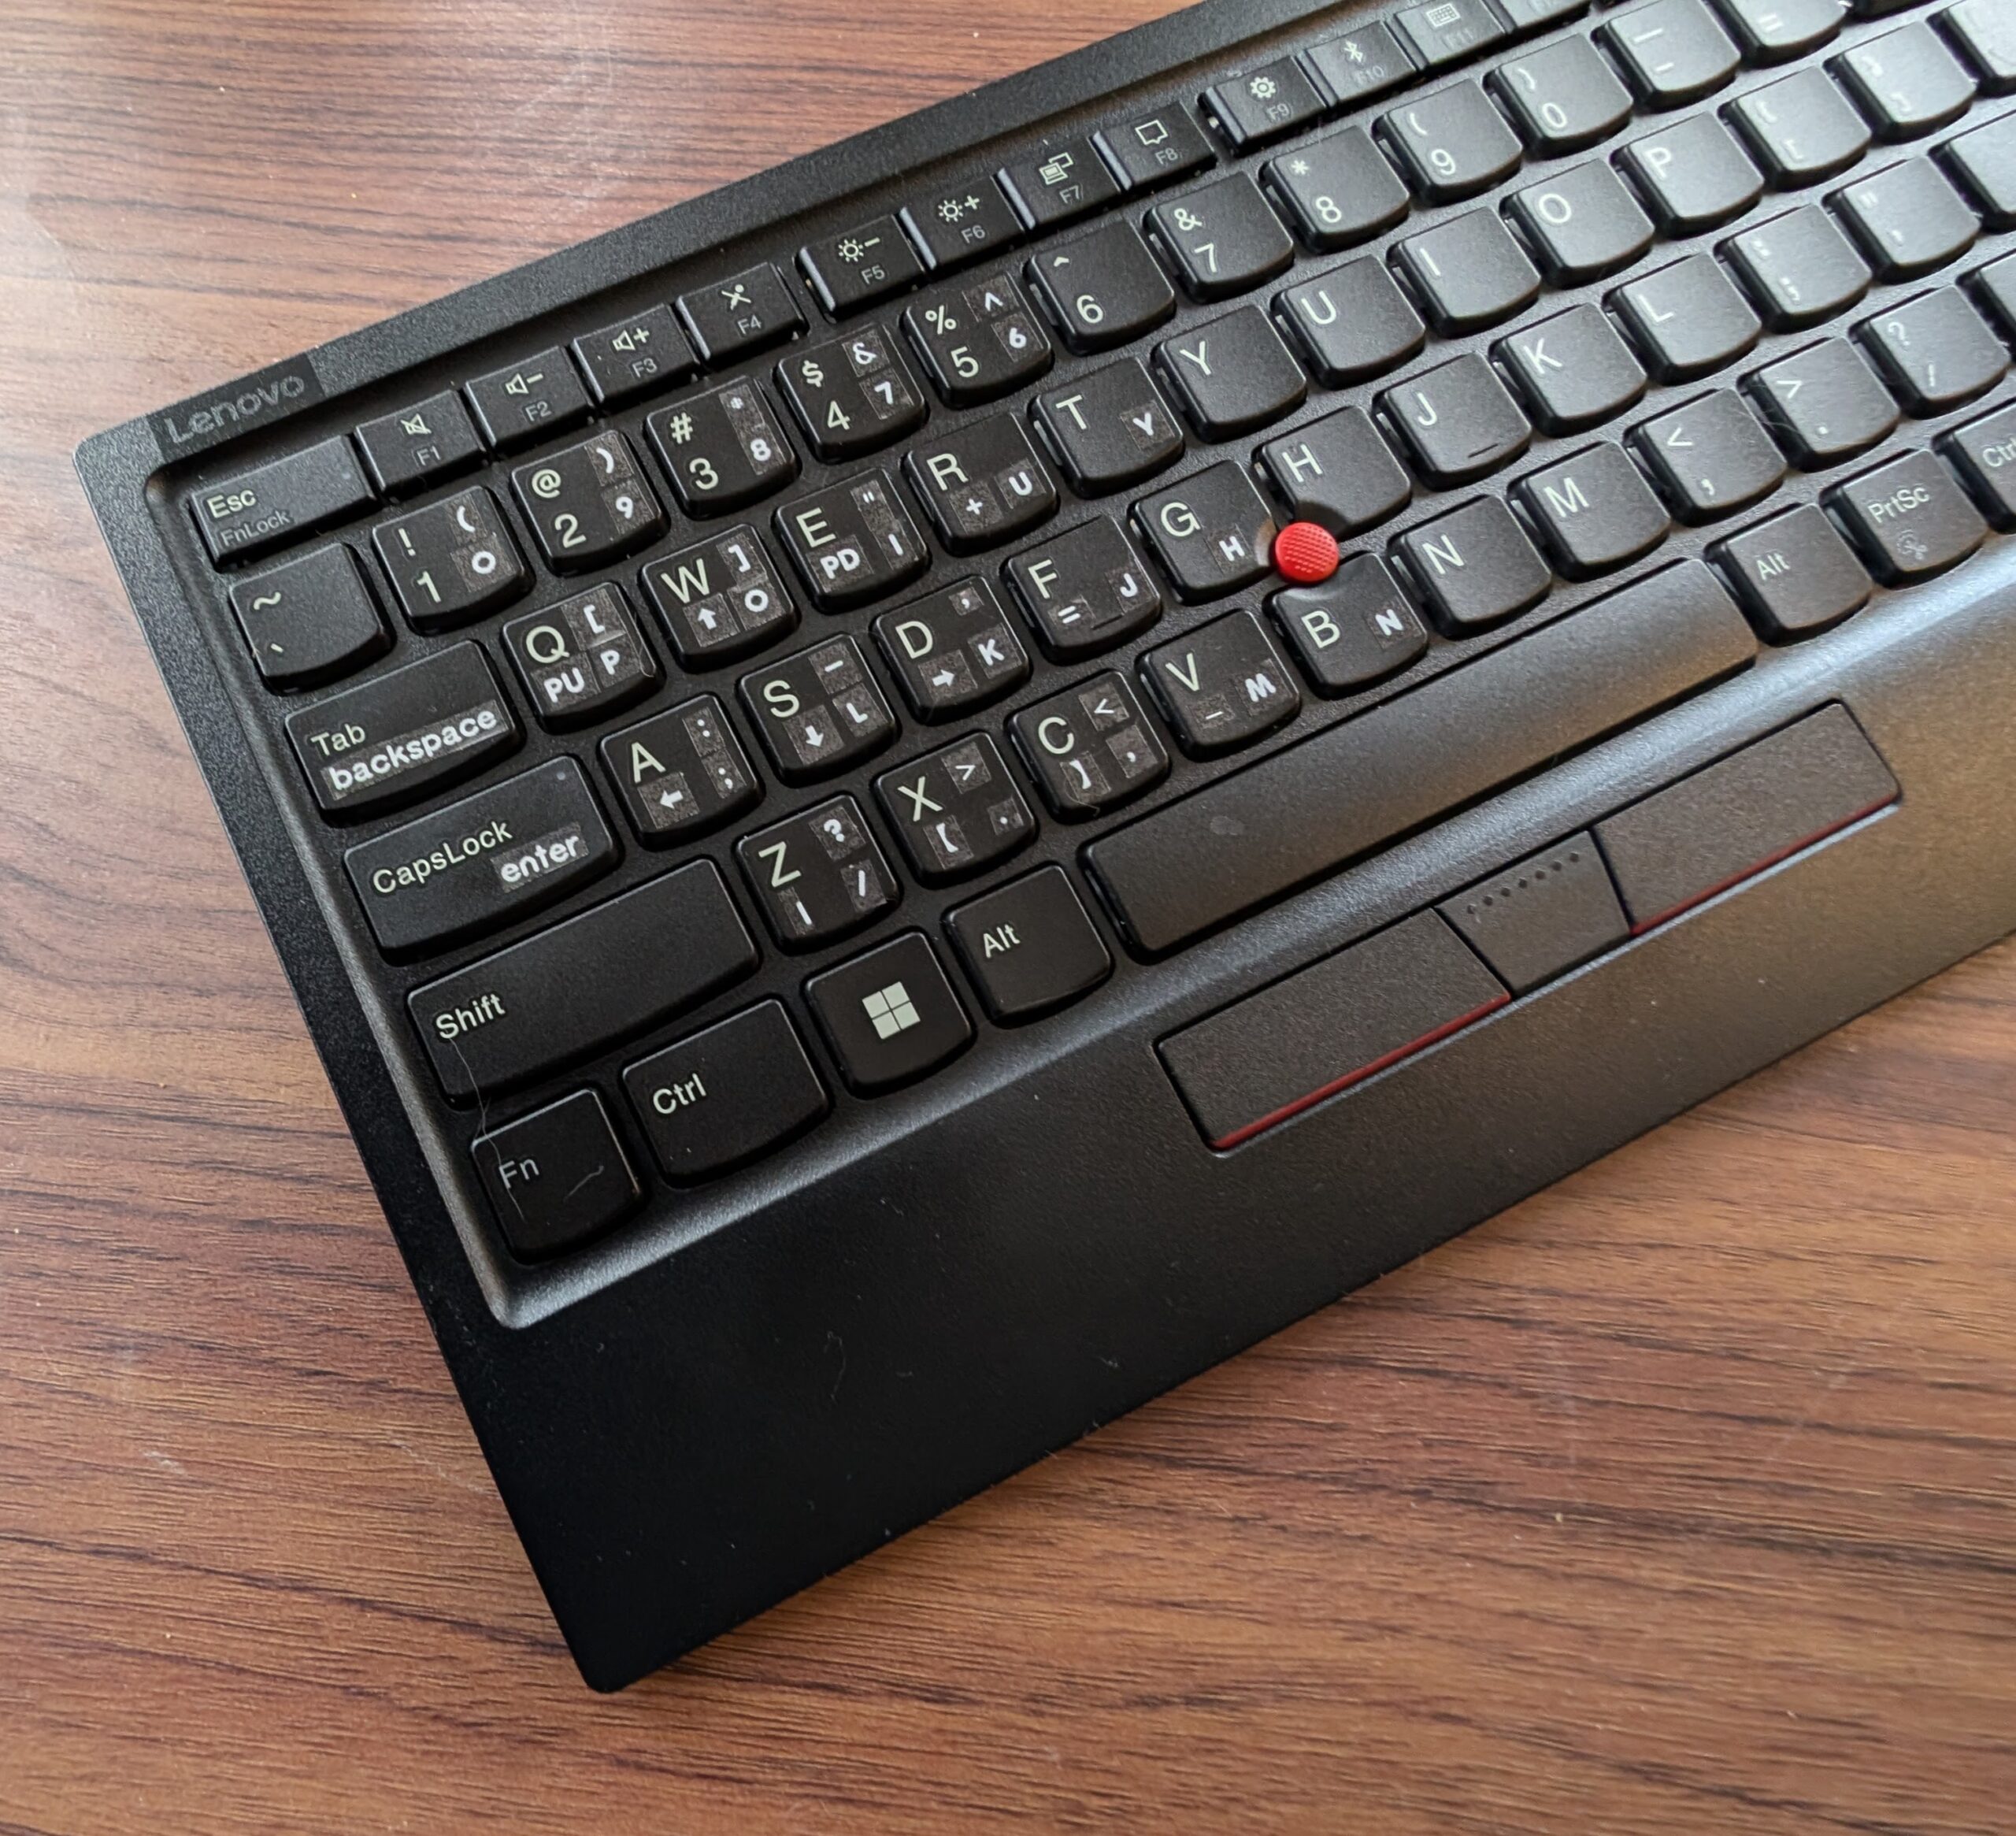
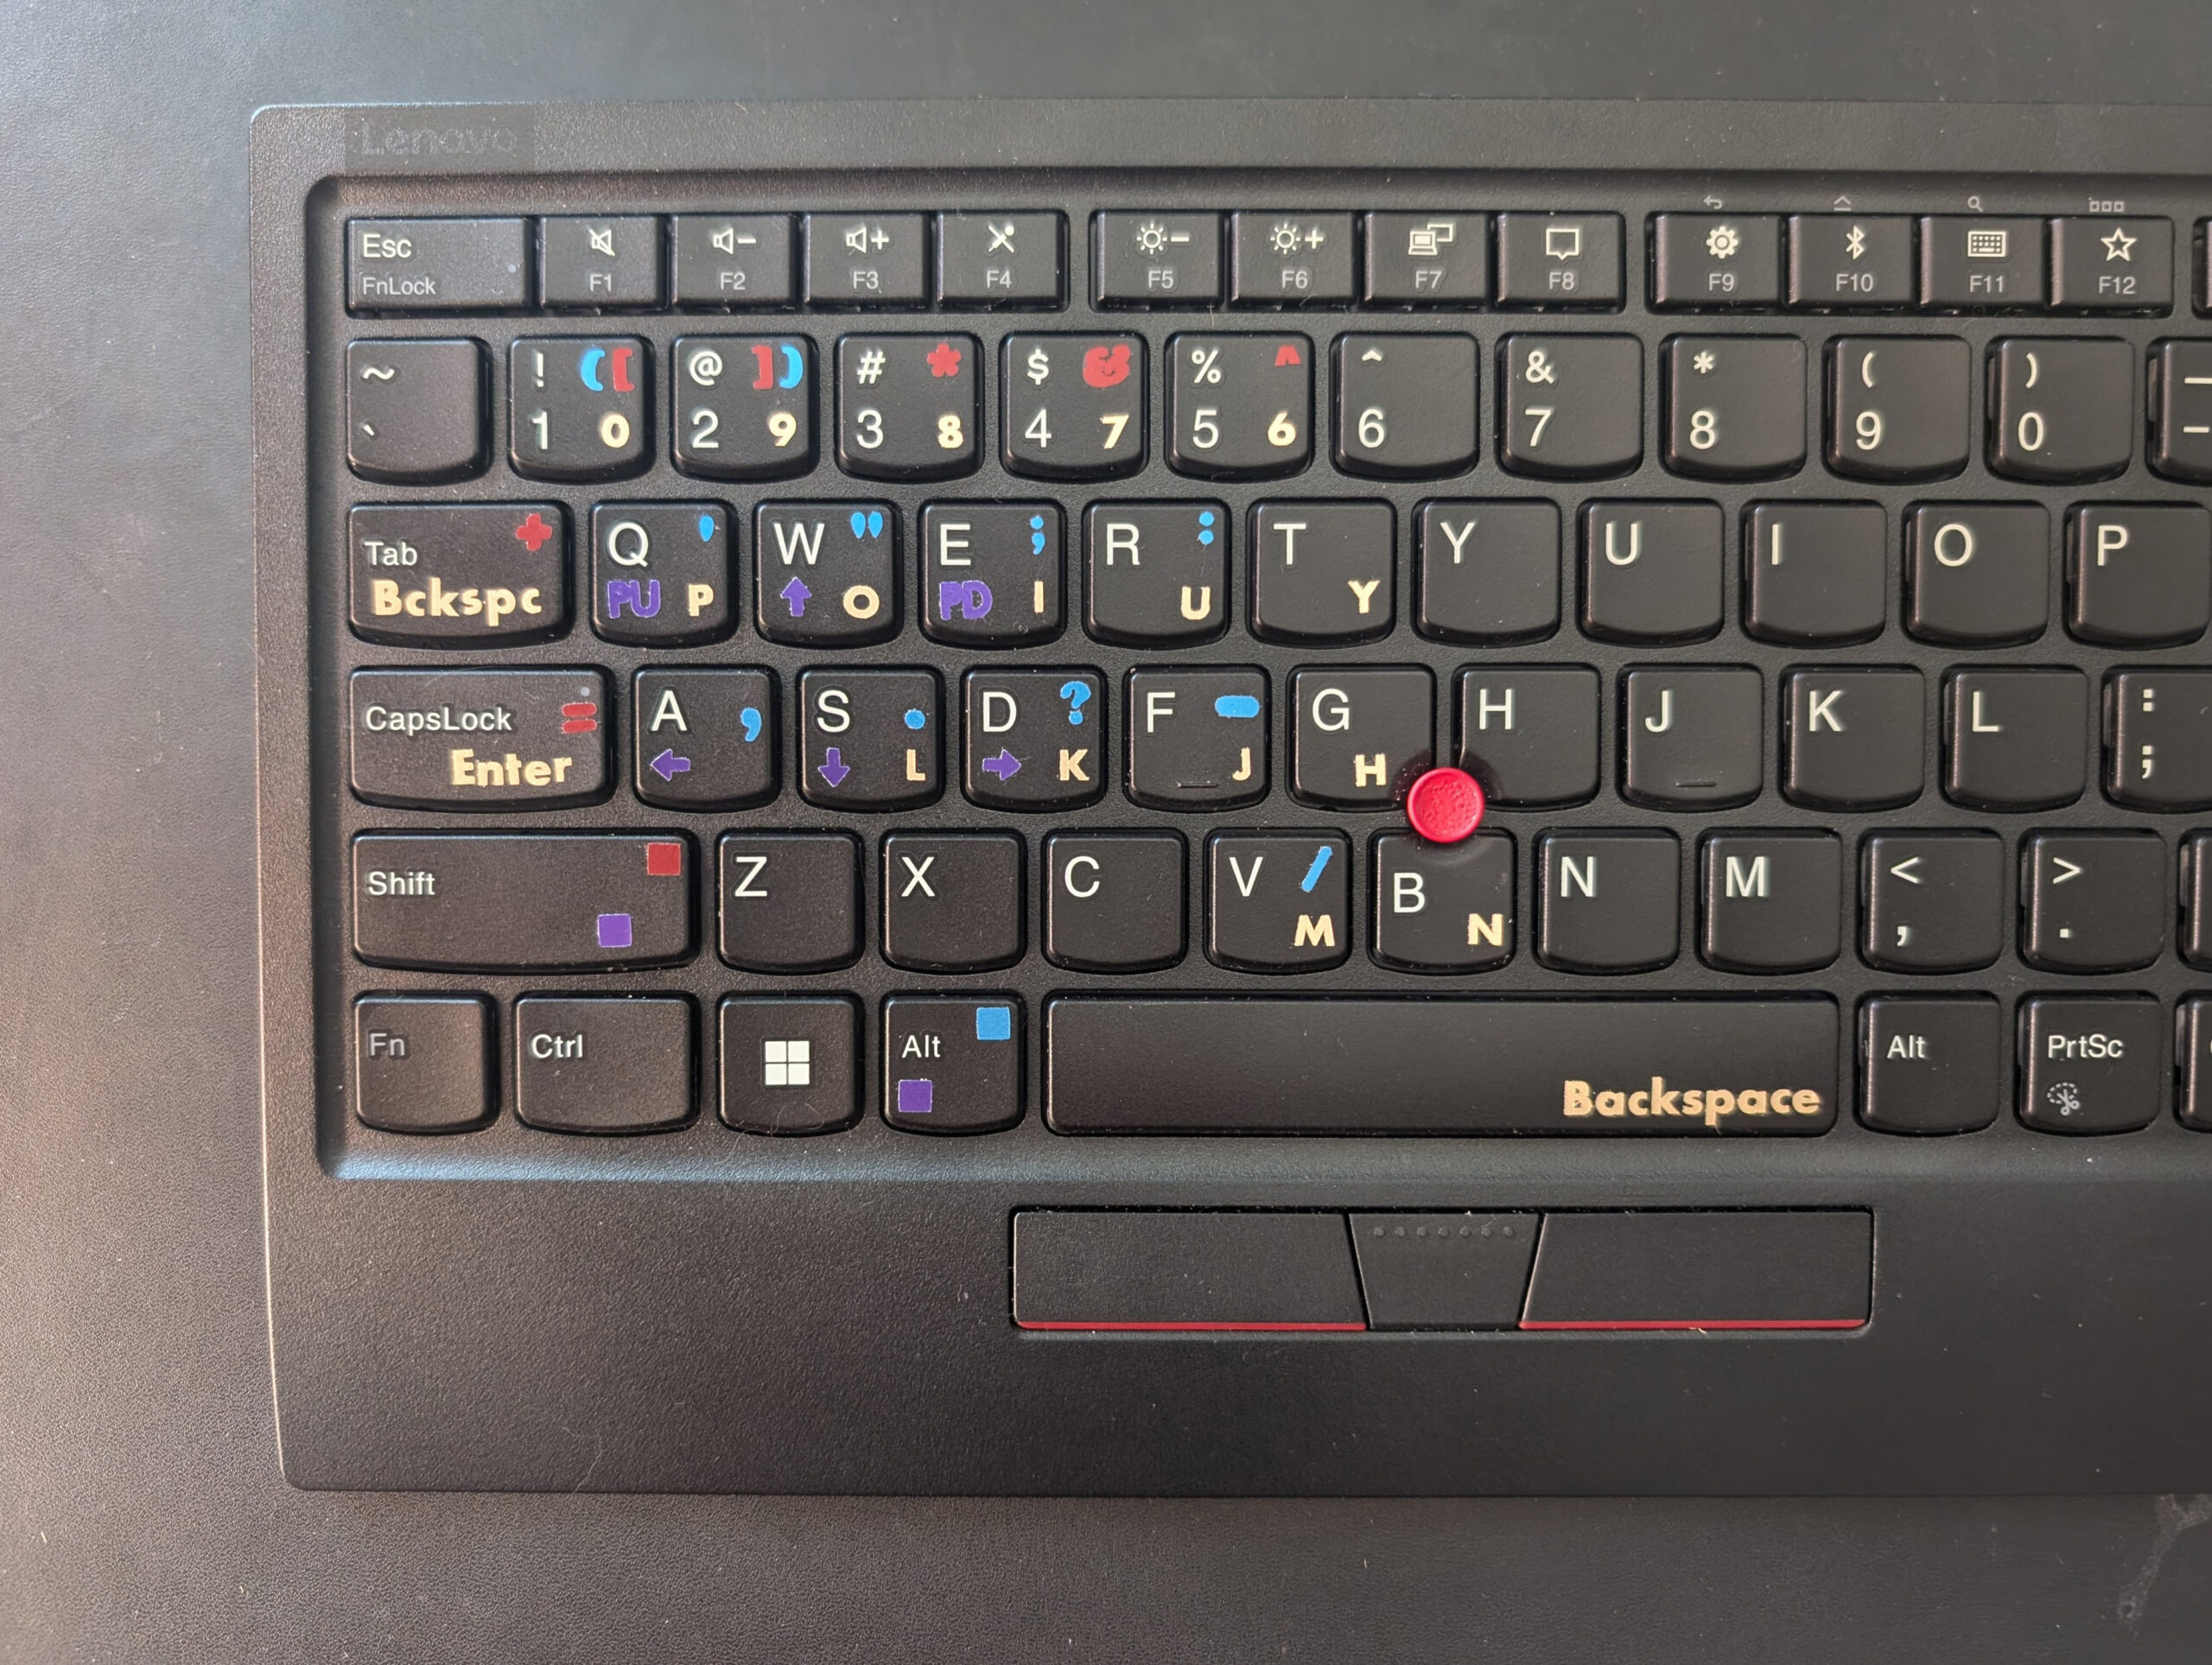
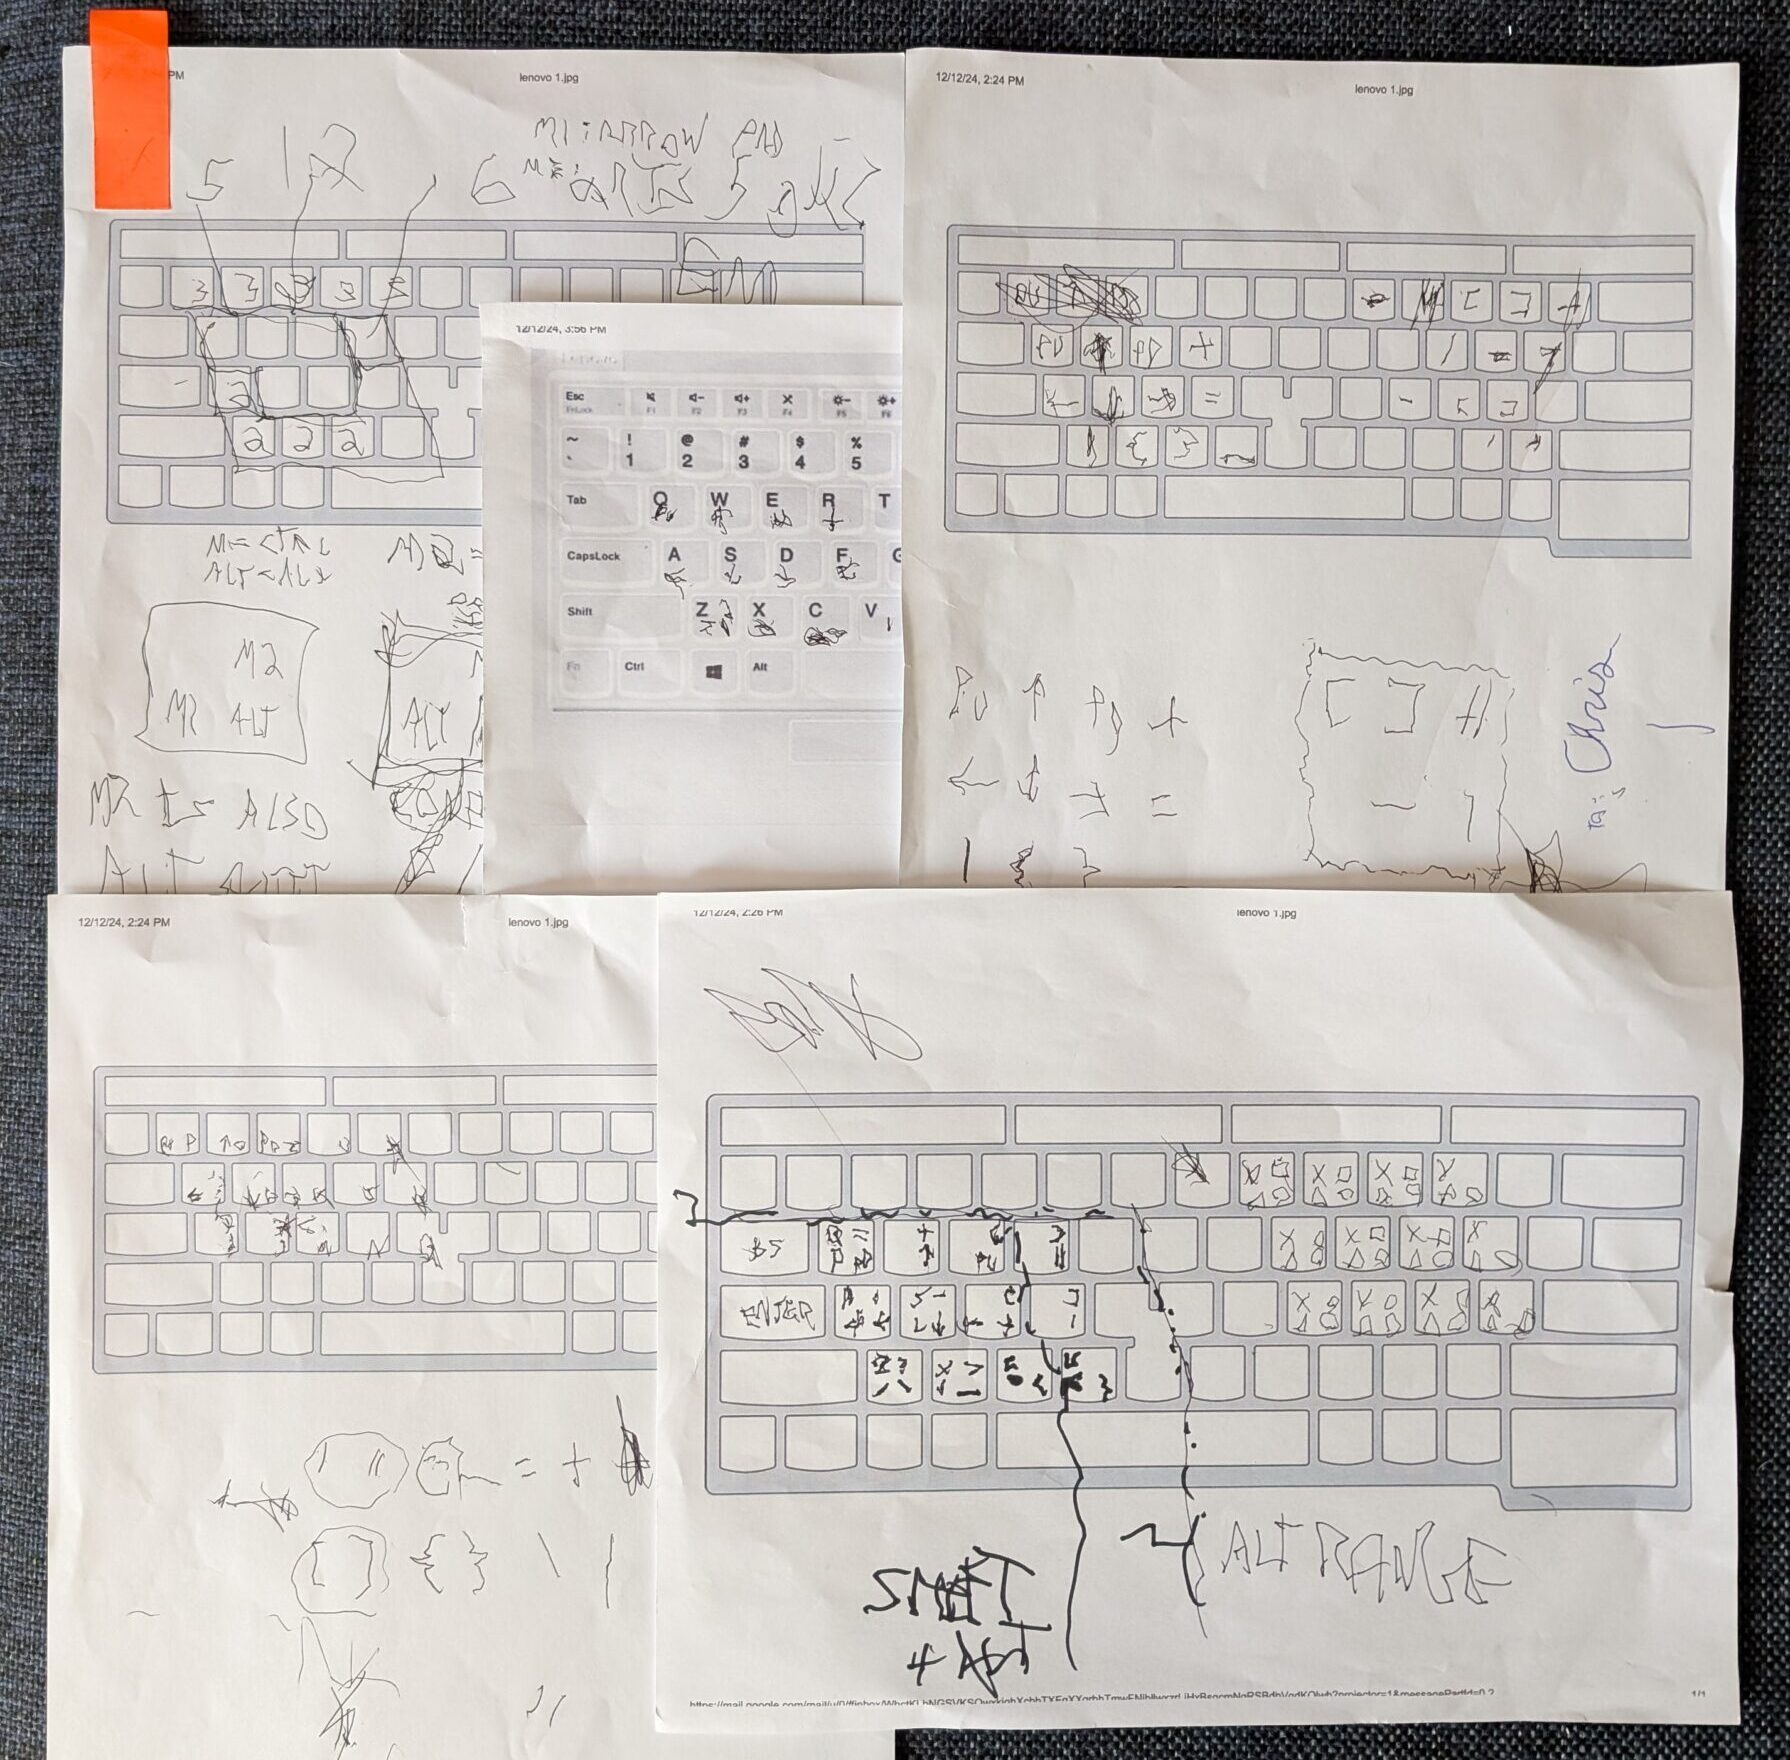
The KURTY keymap can be understood as a system of custom shortcuts that puts everything I need at my (left) fingertips. These shortcuts pair “modifiers” with a regular keys to create desired outputs — much like the Shift modifier causes the letter q key to output a capital Q. Below is an overview of the different color-coded “layers” in play, each of which is associated with specific modifiers and different kinds of outputs. Below, darker-shaded keys are the modifiers for each color layer. Note, too, that only the left half of a keyboard is (needed and) represented.
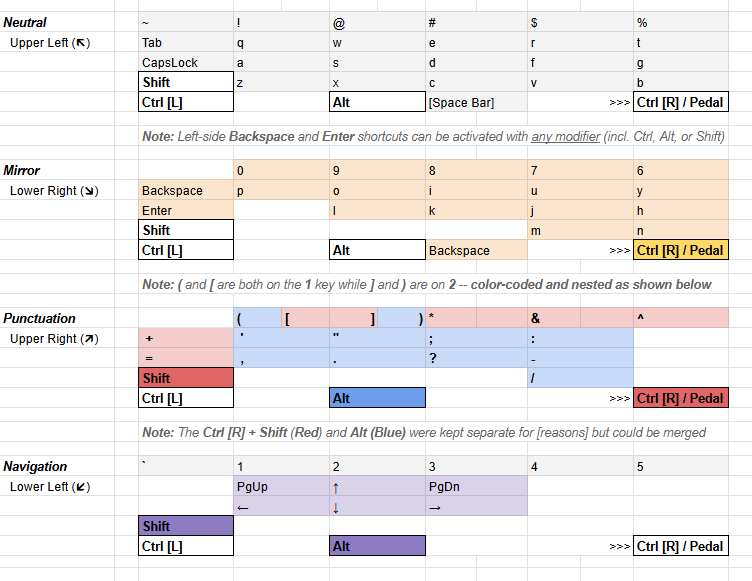
- First (above) is the modifier-free (gray) Neutral layer, which is just a way of describing already-labeled keys and the outputs you’re familiar with (e.g., pressing the ‘q’ key outputs the letter q, naturally).
- The (gold) Mirror layer “reflects” letter and number keys from the right-hand side of the board over to the left (e.g., holding down Ctrl [R] and pressing ‘q’ outputs its counterpart from across the board: p).
- The (blue) Punctuation layer turns letters and numbers into marks (e.g. holding down Alt and pressing ‘q’ outputs an apostrophe).
- The (purple) Navigation layer uses a combination of modifiers to turn a grid of six letter keys into an arrow pad (e.g. holding both Alt and Shift and then pressing ‘q’ yields the PgUp function).
- The (red) Misc layer is a kind of structured catch-all collecting what’s left; like purple, it utilizes two modifiers (in this case: Ctrl [L] and Shift).
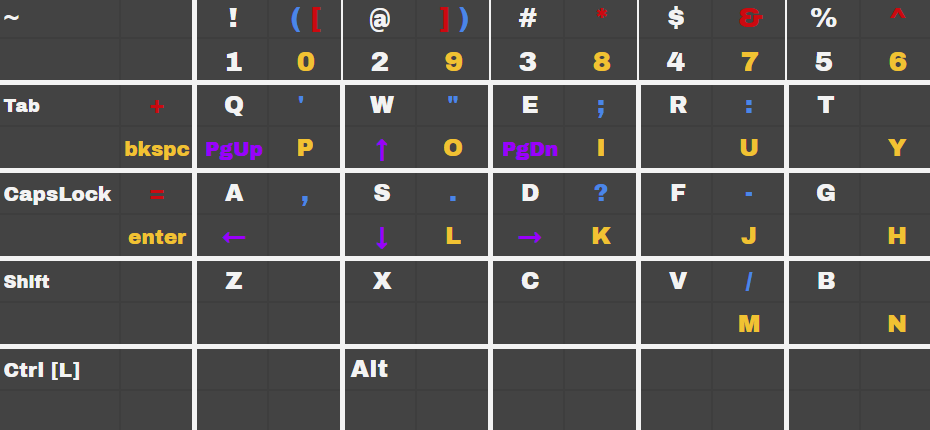
This merged diagram shows color-coded outputs in their designated label locations in one of four “quadrants” on a given key. Keeping these placements clear and consistent is useful for learning and reference purposes. The Shift key provides a familiar example of how locations help: upper symbols on conventional keys indicate Shift-modified outputs (e.g., The number two [2] key plus Shift outputs an at symbol [@]).
Key Recap: Mirrorboard as Design Catalyst
 I didn’t start out with the goal of creating such a comprehensive system. Mostly, I was just frustrated that none of the keyboards I had tried felt like a fit. But the time I spent researching and testing other solutions wasn’t wasted. Other boards helped push me in the right direction, and served as useful reference models. The most explicit catalyst was one particular adaptive keyboard: the Half-QWERTY.
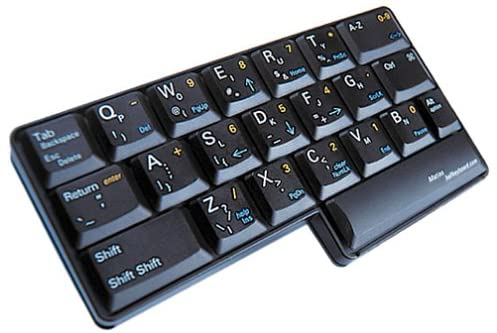
This aptly named peripheral looks like the left-hand side of a two-handed keyboard. Its most relevant feature, for our purposes, is that primary letter keys on the board can also output secondary letters — from the (missing) right side (of a normal board). This trick is accomplished through the use of a specialized modifier key.

On the Half-QWERTY (shown above), labels indicate other functions and outputs associated with each key. The positions and colors correspond to different individual “modifier” or “lock” keys, which are pressed or toggled alone or in combination to access the labeled functions. The left-centered nature of this board was appealing to me, as a newly de facto lefty.
Holding down a modifier key and pressing a letter key generates a secondary output, folded or “mirrored” from the right across what would be the centerline of a full board. For instance: holding down this modifier and pressing the upper-left corner letter “q” outputs a “p” from the upper right-hand corner of a normal board. This mirroring system taps into muscle memory, making it much more intuitive and easier to learn. But the Half-QWERTY hardware had other drawbacks, which start to show once one gets past the core mirrored utility.
Outside Lines: Expanding Keys Along Edges
One of the decisions made by the Half-QWERTY (HQ) designer that I never did understand was the choice to create such restrictive outer boundaries, dramatically limiting the total key count.
Sure, fewer keys can put more stuff in reach, but only up to a point. For instance, cutting off the right half of the board made sense to me … but why also remove the left side of the number row? Two-handed keyboard users don’t find it difficult to reach that row at all, and there are costs to removing more keys than necessary. One big overall advantage of including more keys is that it reduces how many outputs any given key is responsible for generating (and thus also complexity).

And so I found myself wanting to apply a mirroring approach to a more expansive physical board, which would offer greater flexibility and ultimately reduce complexity relative to the HQ. Thankfully, in the course of my keyboard research, I found a relatively simple way to create custom modifier-based shortcuts on a Windows computer, utilizing a free Microsoft utility called PowerToys. This would allow me to map key combinations onto a larger section of a full-sized keyboard while still only using keys a left hand is used to reaching.
Including more keys at the outset helped me cap outputs at four per key maximum (versus up to six on the Half-QWERTY), which ultimately simplified the design as well as the learning and labeling processes. More immediately: including the left side of the number row not only made 1 through 5 directly accessible; it also opened up 6 through 0 to being mirrored across the centerline, just like the letters. The HQ, in contrast, only mirrors letter keys, not numbers.
The Gold Layer: Mirror Modifier Leads to Expansion Plan
Within newly broadened borders, I worked out a first (mirrored) “layer” of functionality, using a consistent “modifier” key to reflect letters and numbers from the right over to the left side of the board. Like all other layers that were to follow, this one is strictly additive by design — it simply offers a new secondary, left-side way to tap into right-side functionality … without compromising a user’s ability to tap into the original functions of the underlying keyboard.
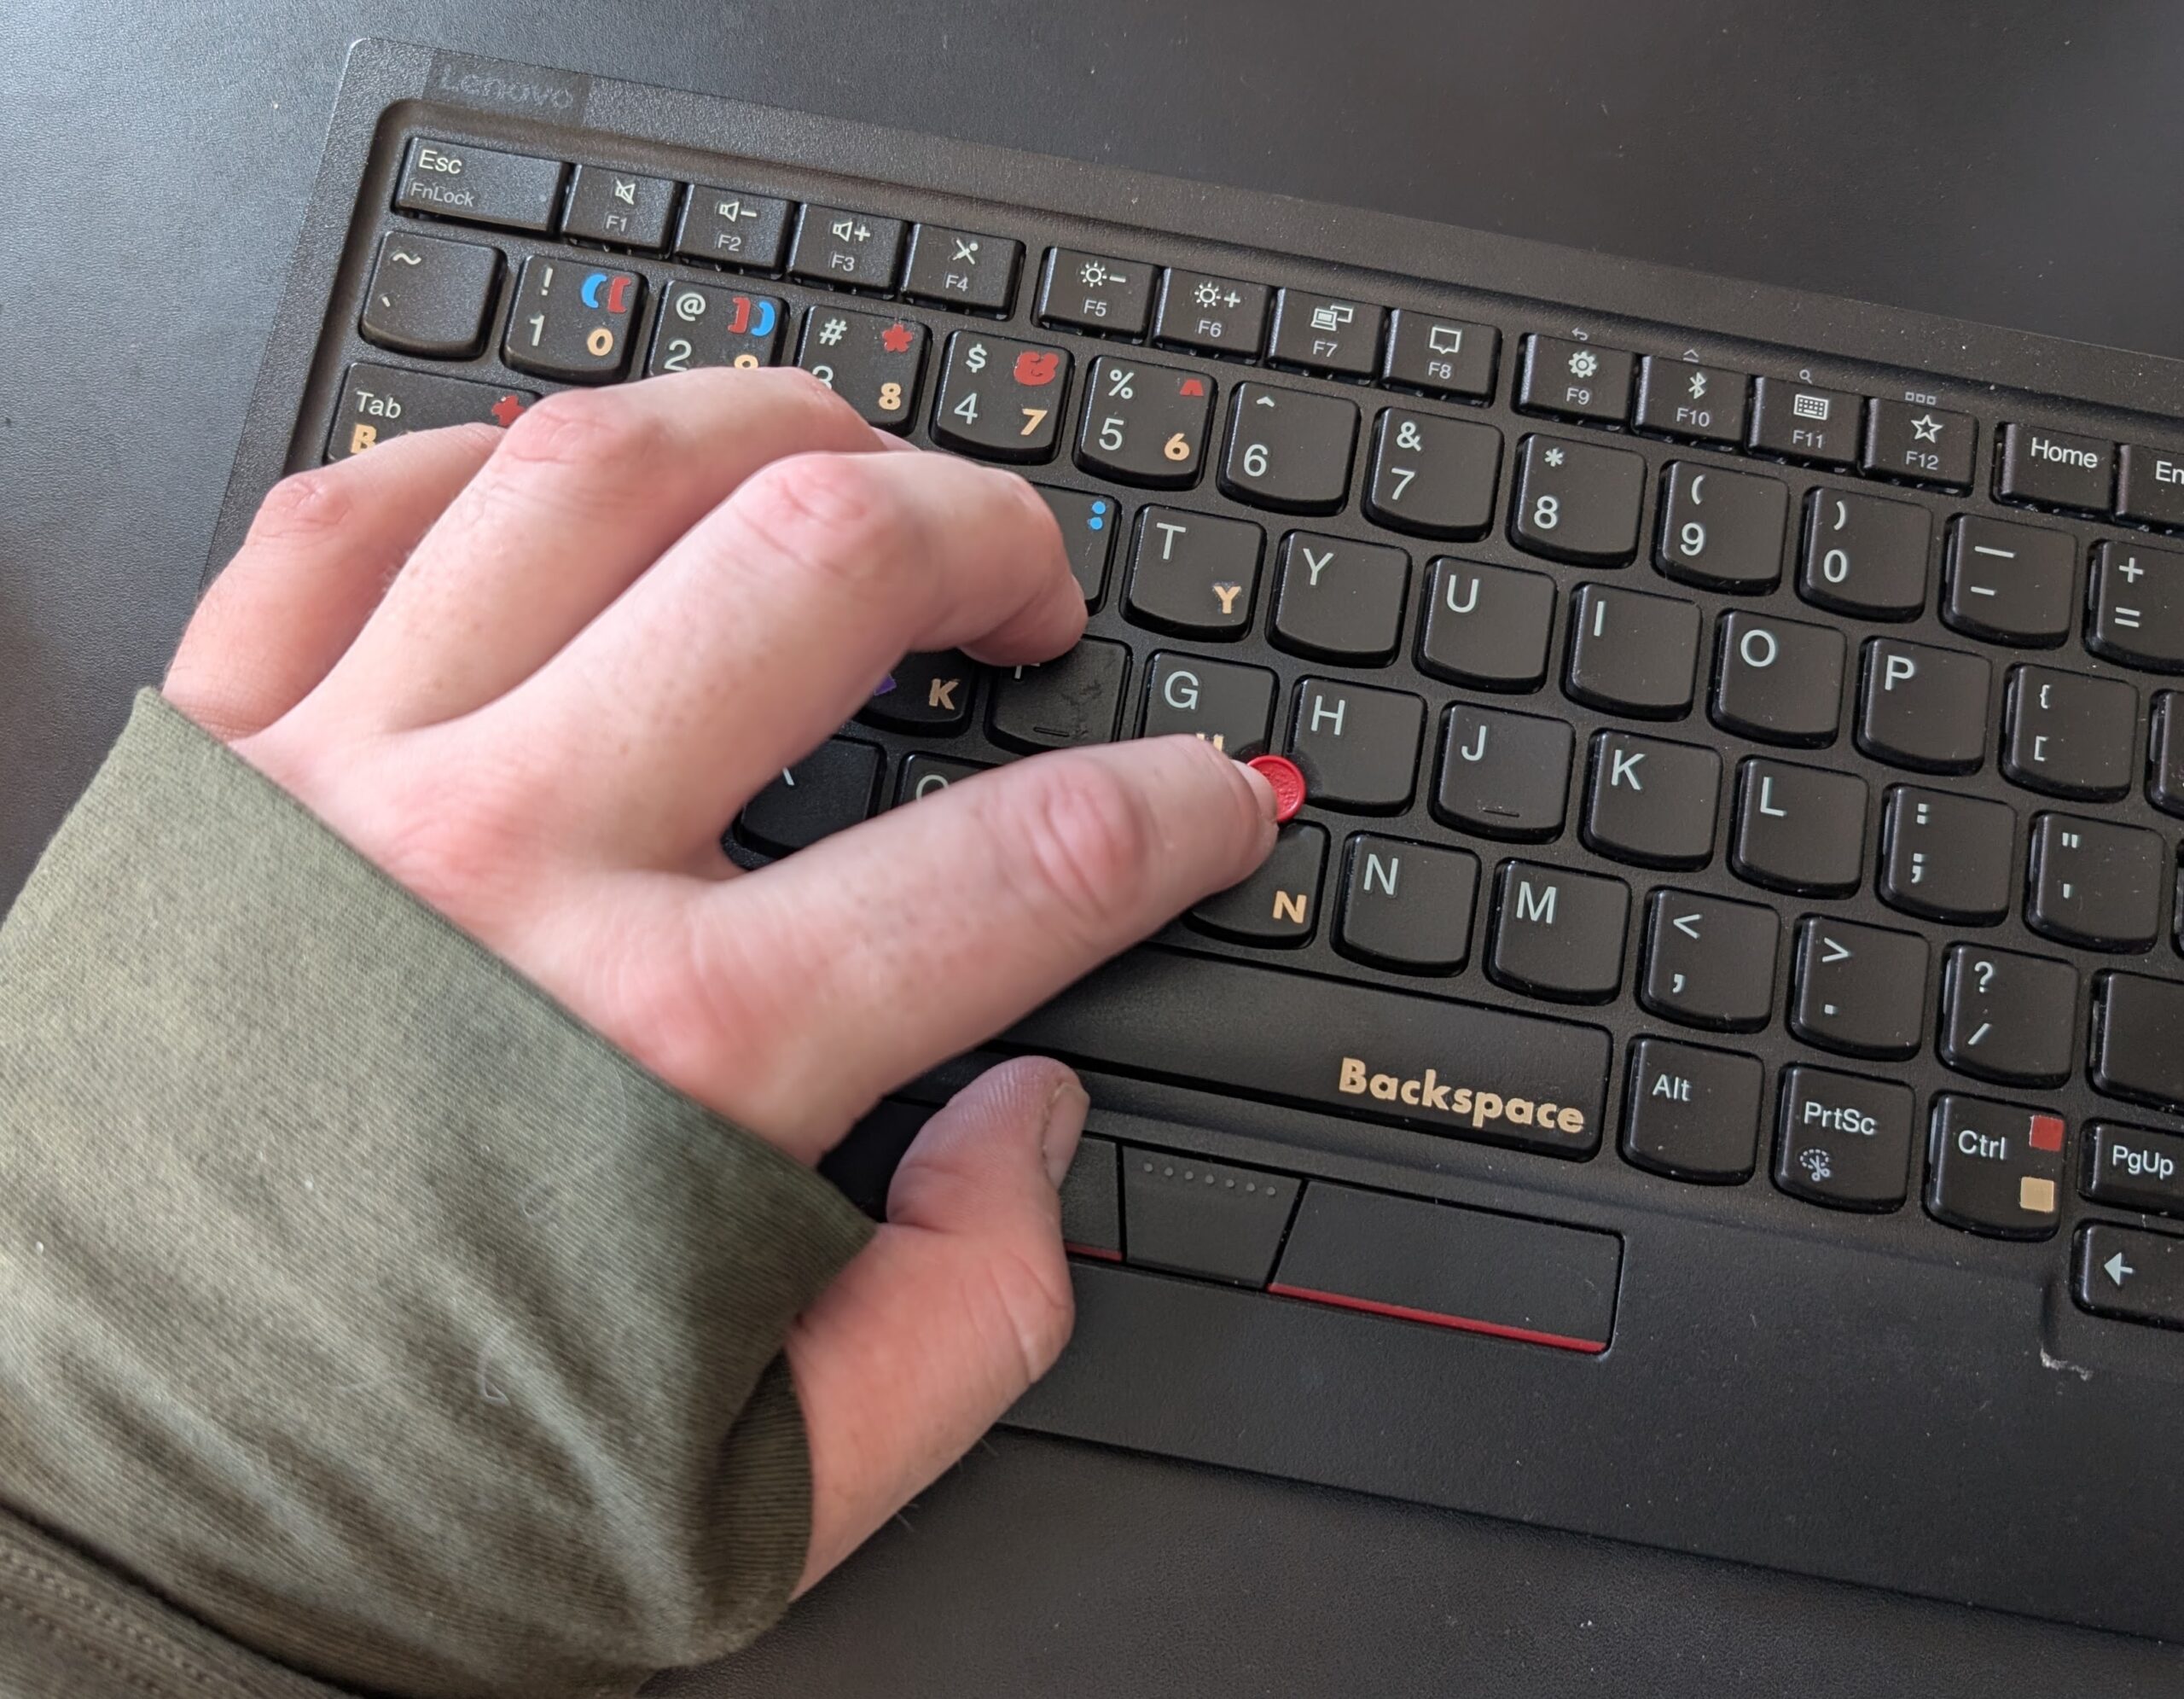
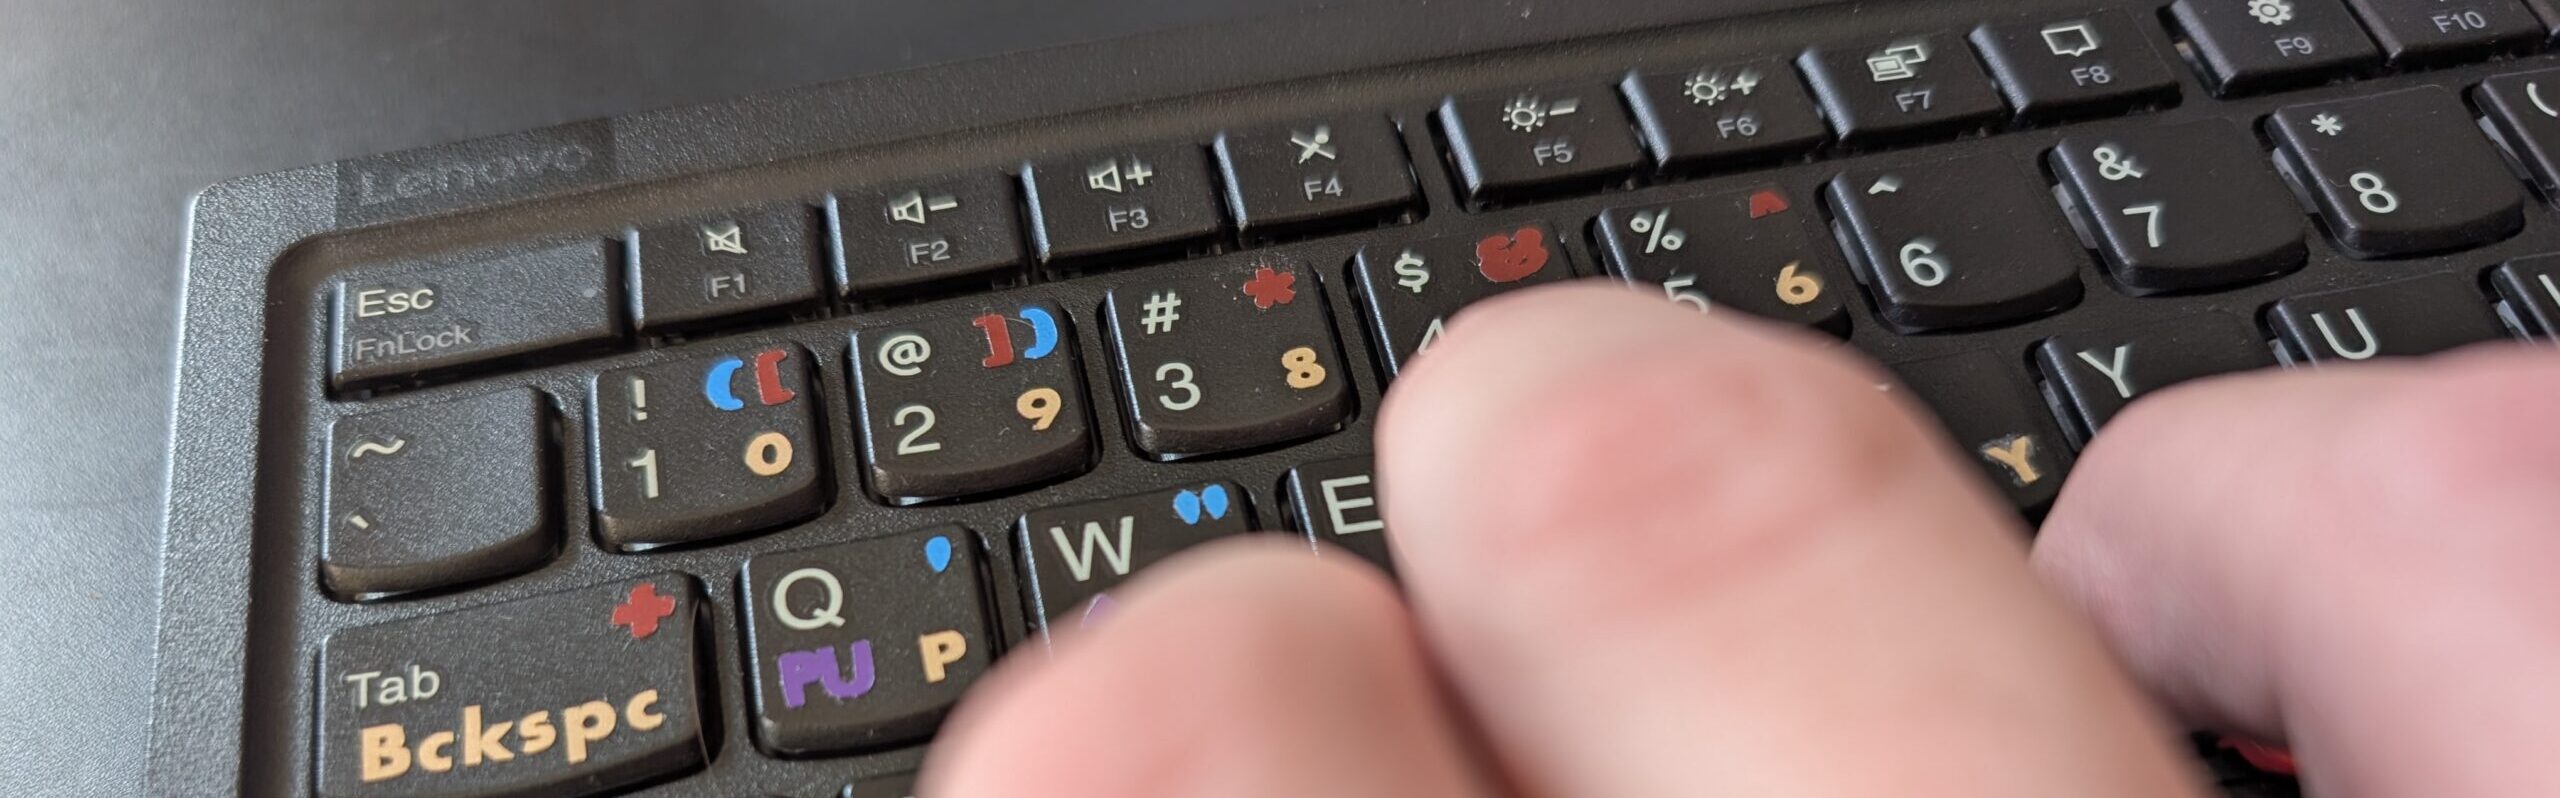
![[NOTE: While you can indeed use the right Ctrl button to activate this layer, I programmed a foot pedal to trigger that modifier, finding it faster and smoother than using a key on the board. You can also reconfigure this as desired. Subsequent modifiers are simpler, one-or-two key affairs, but since this is the first under discussion, it seemed important to clarify upfront]](https://99percentinvisible.org/wp-content/uploads/2025/05/Screenshot-5.png)
The Mirror layer is shown in gold, with its layer-specific “modifier” key: Ctrl [R]. That modifier makes keys output what’s shown on this colored layer. If you hold down the Ctrl [R] modifier and press the q key, for instance, the system will output a p. Understanding this step is critical, as it illustrates how “modifiers” work across this entire custom keymap. Holding down a modifier changes another key’s output. New modifiers also work with existing ones. Let’s say you want to generate an uppercase P. You would press down the gold layer’s modifier as well as the Shift key, as in: hold down Ctrl [R] and Shift, then press the q key. So Ctrl [R] + q = p and then Ctrl [R] + Shift + q = P.
Applying a mirror-style approach to my own two-handed (Lenovo) keyboard allowed me to type the entire alphabet with my left hand while keeping it on the left side of the board. I also retained valuable full-keyboard advantages, such as: being able to hunt and peck as a fallback option, and using a built-in, finger-driven (TrackPoint) mouse. But mirroring was only the first step — having taken it, I realized that I could keep going and develop a full one-handed touch-typing keymap.
Inside the Lines: Comfortable Reach is Key
As the project expanded, reachability became an increasingly vital consideration in ways I hadn’t anticipated. Some combinations I tried required awkward contortions — moves that would be difficult to perform at speed and create stress through repetition. Initially, for instance, I assumed that all left-side letter keys would be ideal candidates for multifunctionally because they were easy to reach. That turned out to be a naive (if perhaps understandable) preconception, which I only discovered through testing and iteration.
As I tried out various modifier and letter key combinations, I came to realize that with Shift or Alt held down, for example, adjacent lowest-row letter keys (such as Z, X, and C) were extremely awkward to press. (And I had been planning to load those keys up with layers of functions!) Hands-on testing led me to reconsider giving these keys secondary functions at all, which in some ways was just as well: I was already concerned with having punctuation split across multiple layers, and this change reinforced the need to give them their own.
The Blue Layer: Simplicity via Punctuation Consolidation

On this Punctuation layer, you’ll notice that the q key position has an apostrophe highlighted in blue. Once again, we have a darker shade of blue to indicate which modifier toggles this layer. In this case, holding down Alt and then pressing the q key generates an apostrophe (‘).
At first, some lower-left letter keys had punctuation marks as their mirrored, right-side counterparts, reflected in the first (gold) mirror layer. And I had situated other oft-used marks on a (blue) layer, which was made to be easily accessed with one simple modifier key. As lower-left reach issues became clear, however, I realized that I could strip that area’s letter keys of mirrored punctuation and put it all on blue. This play enhanced usability by allowing me to consolidate marks on a single layer and eschew physically challenging key combinations.
The Purple Layer: Preserving a Sensible Sense of Direction
When considering the six-unit grid of navigation keys, made up of four arrows and their associated PgUp and PgDn companions, I was again confronted with a conflict between the muscle memory advantages of mirroring and actual usability testing. For the sake of science or whatnot, I gave mirroring a shot briefly, but having the left arrow facing left and the right arrow facing right felt much more intuitive. In fact, this layer was the easiest to learn in the end — likely because I’ve used the WASD grouping as left-side arrow keys for PC games now and then.

The purple Navigation layer turns our now-familiar q example key into a PgUp function by using (i.e. holding down) Alt and Shift modifiers in tandem.
Part of this whole process was prioritizing which layers got simpler single modifiers versus sets of two. At first, I had the purple layer tied to just one modifier. But after testing it alongside other draft layers, I opted to tie a pair of modifiers to purple — because I really only needed three fingers to use its six keys. This particular finger trio conveniently left my thumb and pinky available to press two nearby modifier keys with ease (and freed up a valuable solo modifier for use elsewhere).
The Red Layer: Rounding Up Loose Odds & Symbolic Ends

The red Symbol (or Misc) layer doesn’t utilize our prior example key (q), which is already maxed out at four functions. Instead, for instance: use Ctrl [L] & Shift (held down at the same time) to make the Tab key output a plus (+) symbol.
With a mirrored layer for letters and numbers, another single-modifier layer for common punctuation, and a third layer for navigation, there were inevitably still some lesser-used leftovers that needed to be located somewhere. These were relegated to a fourth and final layer along with other obscure key outputs, some of which reflects limited number-row mirroring logic (specifically: symbols found above numbers on the right-hand side, which require Shift anyway).
The two label layers (red and blue) situated in the upper right quadrant (of the labeled keys) also highlight some details that reflect minor adjustments made over time. The brackets and parentheses, for instance, were modestly reshuffled based on usage frequency — and, here again, I favored the logical order of the ( and ) symbols over a mirrored reversal. Each round of changes required reconfiguring the reference spreadsheet, laying out new labels, and reprogramming the keymap. So logically, for the sake of efficiency (and sanity) I tested changes, then waited to implement an array of solutions together, limiting the number of fully-deployed draft versions.
Color Choices: Creating Clarity via Contrast
Working on physical fronts (with a keyboard) as well as digital ones (spreadsheets and remapping) helped the design retain an unfinished feel, in a useful way. But label changeovers also marked natural stopping points — chances to step back and reevaluate various aspects of the board, including the parameters of the labels themselves.
In early-draft trials, simple white-on-clear labels were used, printed on a handheld label maker. At this stage, the corner of the key in which a given label was located served as the sole indicator of its associated modifier(s) key(s) — helpful, if not always quick and easy to follow. This location-based indicator was preserved but also built upon over time.
To improve visibility (and usability), later versions incorporated colored vinyl labels — these helped distinguish between different layers, including the neutral white baseline labels. Colored squares were also added to modifier keys as a cue for early learning phases. As for color choices: those were largely pragmatic, based on material availability and the need to maximize clarity through highly contrasting hues.
 I sorted four picks by relative brightness to reflect the priorities of different layers. More visible colors were paired with more important modifier layers — gold, for instance, is tied to the layer with letter keys. I also placed higher priority labels on the right sides of keys, making them easier to see without lifting a hand to look — punctuation, for instance, is in the upper right quadrant.
The choice to limit outputs per key to a maximum of four (as mentioned earlier) was driven by a desire to make things clearer and easier than on the Half-QWERTY, but it was also framed in part by practical labeling considerations. With this four-function key cap, labels would only have to occupy one of four corner quadrants on a key — they could be larger, more legible, and less confusing.
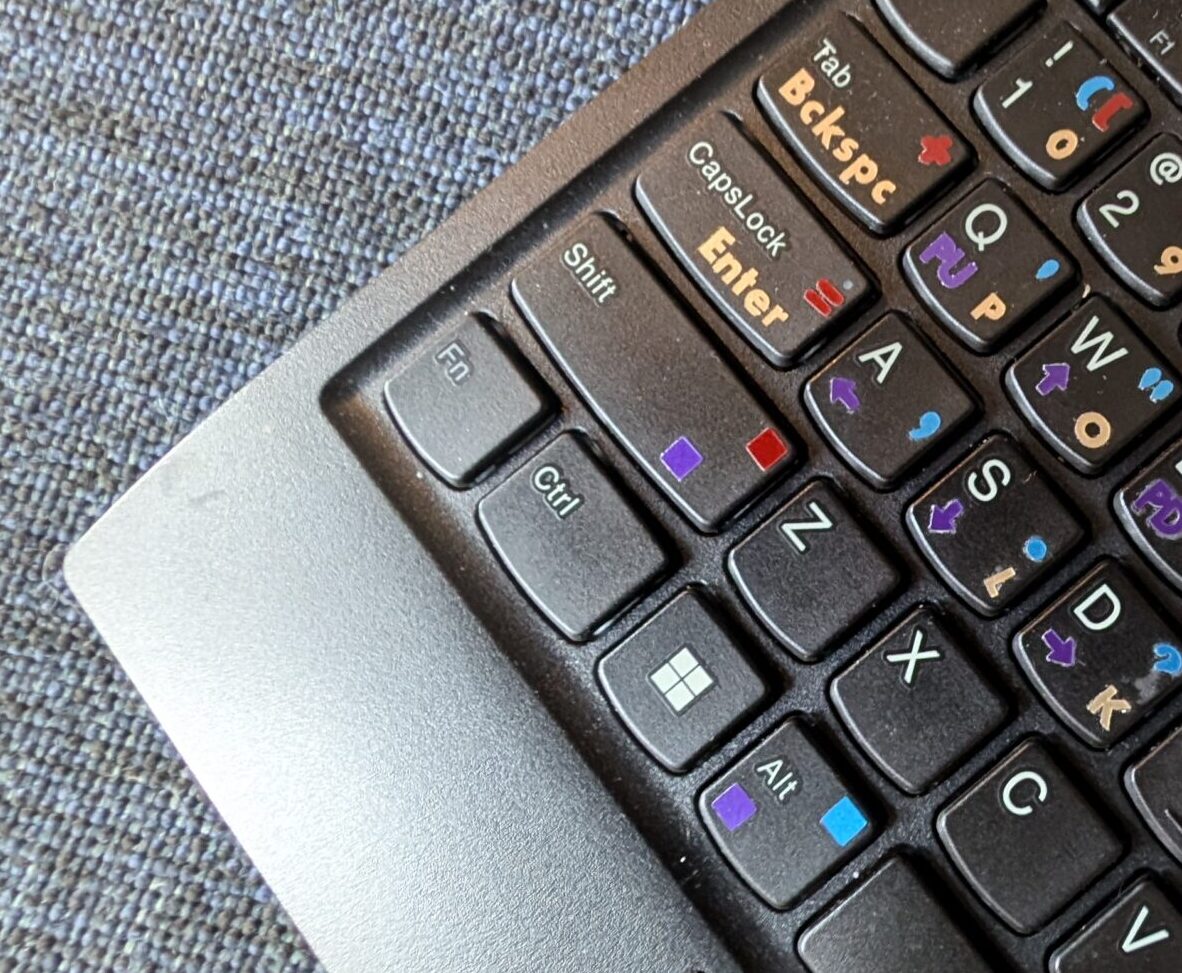
The colored cue squares on modifiers wound up being redundant. In the end, the process of testing and iteration helped not only with design development but also with learning to use the keymap — much like writing and rewriting notes helps one in a classroom setting. With time, and a resolved design, I’ve gotten better at one-handed touch-typing, which has reduced the need for physical labels in general, too. Eventually, I may even be able to leave them behind altogether, but for now, like my full underlying keyboard, they’re still nice to fall back on.
If you’re interested in trying out the KURTY yourself, click through to find installation instructions and a color-coded user manual, plus other reference and troubleshooting materials. It’s relatively easy to set it up in a matter of minutes. After that, you can also edit my layout, personalizing the keymap for your needs. I sincerely hope some folks in similar situations find this to be a helpful long-term solution!
Adapt or Design — A Project of 99% Invisible

Comments (1)
Share
I switched to a split ortholinear keyboard (and a Workman layout!) a year ago after doing a lot of research on different keyboards. I am a big fan of it and am honestly surprised that split keyboards aren’t more popular. One of the places I did a bunch of research was the Ergo Mech subreddit. I sometimes see people ask in the subreddit about recommendations for someone with a disability. The recommendation I often see is to create a custom keyboard layout to suit the individuals needs. When setting up the firmware for my keyboard I saw the option for one-handed typing; I wonder if that would do some of the work Kurt did automatically.
Very interesting series, thanks for sharing!
PS as a proud southpaw I understand what the author means when he said “the world is setup for left handed people last”. It’s nice to be validated!