After an accident incapacitated one of my hands, even trying to tie my shoelaces became an exercise in frustration. But I also wasn’t keen on giving in and boxing up my laced shoe and boot collection in favor of slip-ons. So rather than sole soul searching for new footwear, I began looking for loopholes – ways to get around the knotty problem of tying laces, but without kicking my current footwear to the curb. I found a few more straight-laced, off-the-shelf shoe-lutions, but was put off by some more visible elements of their design, and so I started to cobble together a more subtle DIY kit-of-parts alternative.
 After some research, trial, and error, I got started reconfiguring my ordinary shoes to work one-handed, which I heartily recommend, depending upon your circumstances. But thinking outside familiar shoe boxes, there are shoe brands and footwear lines devoted to designing for mobility impairments. Some pairs need no hands at all to be put on and taken off.
Good, Fast, Cheap? Triage Them on for Size

As the adage goes: cheap, good, fast – pick two. An all-in-one lace locking kit will set you up fast and for cheap. A slightly more time consuming DIY approach can keep things inexpensive but yield a better result, covering the overlap of cheap and good. Finally, as far as good and fast are concerned: assistive footwear designs offer a quick way to a robust solution that costs accordingly. We’ll look at that last type in the end, but first we’ll kick things off with some ways to rework what you already wear for one-handed use before looping back to survey all-in-one shoe solutions to give you a running start.

Pun Purge: I’m no expert in the shoe department, but I’ve run down a lot of adaptive leads since my accident. Newly impaired, I’ve been less of a shoe-leather journalist, trying things on by mail as more of an armchair gumshoe (and footing bills on a shoestring budget). Still, I’ve walked the talk, as they say. But if you’re waiting for me to stop shoehorning wordplays into every sentence, well, you’re welcome to walk a mile in my shoes — but you might find the shoe on the other foot. In any case, let’s get back on track!
Fast & Cheap: Off the Shelf & Under the Cuff
 If you want to continue to use laces, but never want to tie them again, there are quick conversion kits with all the parts you’ll need to make that happen. Lock Laces and other tieless shoelace (and bootlace) systems can work fine if you only have a pair or two to deal with, and want to just buy something complete with instructions to get the job done. But there are drawbacks in terms of price, annoyingly bold logos (although those, at least, largely disappear behind pantleg cuffs), and hefty clips that replace the simple plastic cylinders at the tips of typical laces.
 The basic mechanism behind these “complete kit” options is simple, with relatively minor differences in execution. First you take the lock and press down on a button which opens up two holes running through the gadget. After you slide your laces through those gaps, release the button and they become locked in place. At this point, however, your laces will be too long and will drag on the ground, because their original length was meant to accommodate the tying of loops. Simply snipping off the ends opens them up to fraying, so these kits come with things like plastic clamps for the tips to prevent split ends after you cut them down to size.
 All of that works fine for a quick fix, particularly in a post-injury haze when you just want to check things off a list. But if you’ve got a lot of laced shoes, or are injured for the long haul, or would prefer something a bit more subtle in appearance, or some combination of the above: there are more freeform paths you may want to tread instead.
Cheap & Good: Creating Your DIY Kit of Parts

By skipping straight to DIY, you can begin building up a collection of parts and customizing aesthetic outcomes, all while saving money by buying generic components in bulk. The potential combinations are virtually limitless — you can mix and match all kinds of design elements. Locks come in a range of shapes and sizes as well as colors and styles, while aglets let you tip your laces in different textures and materials, including various shades of plastic and metal.
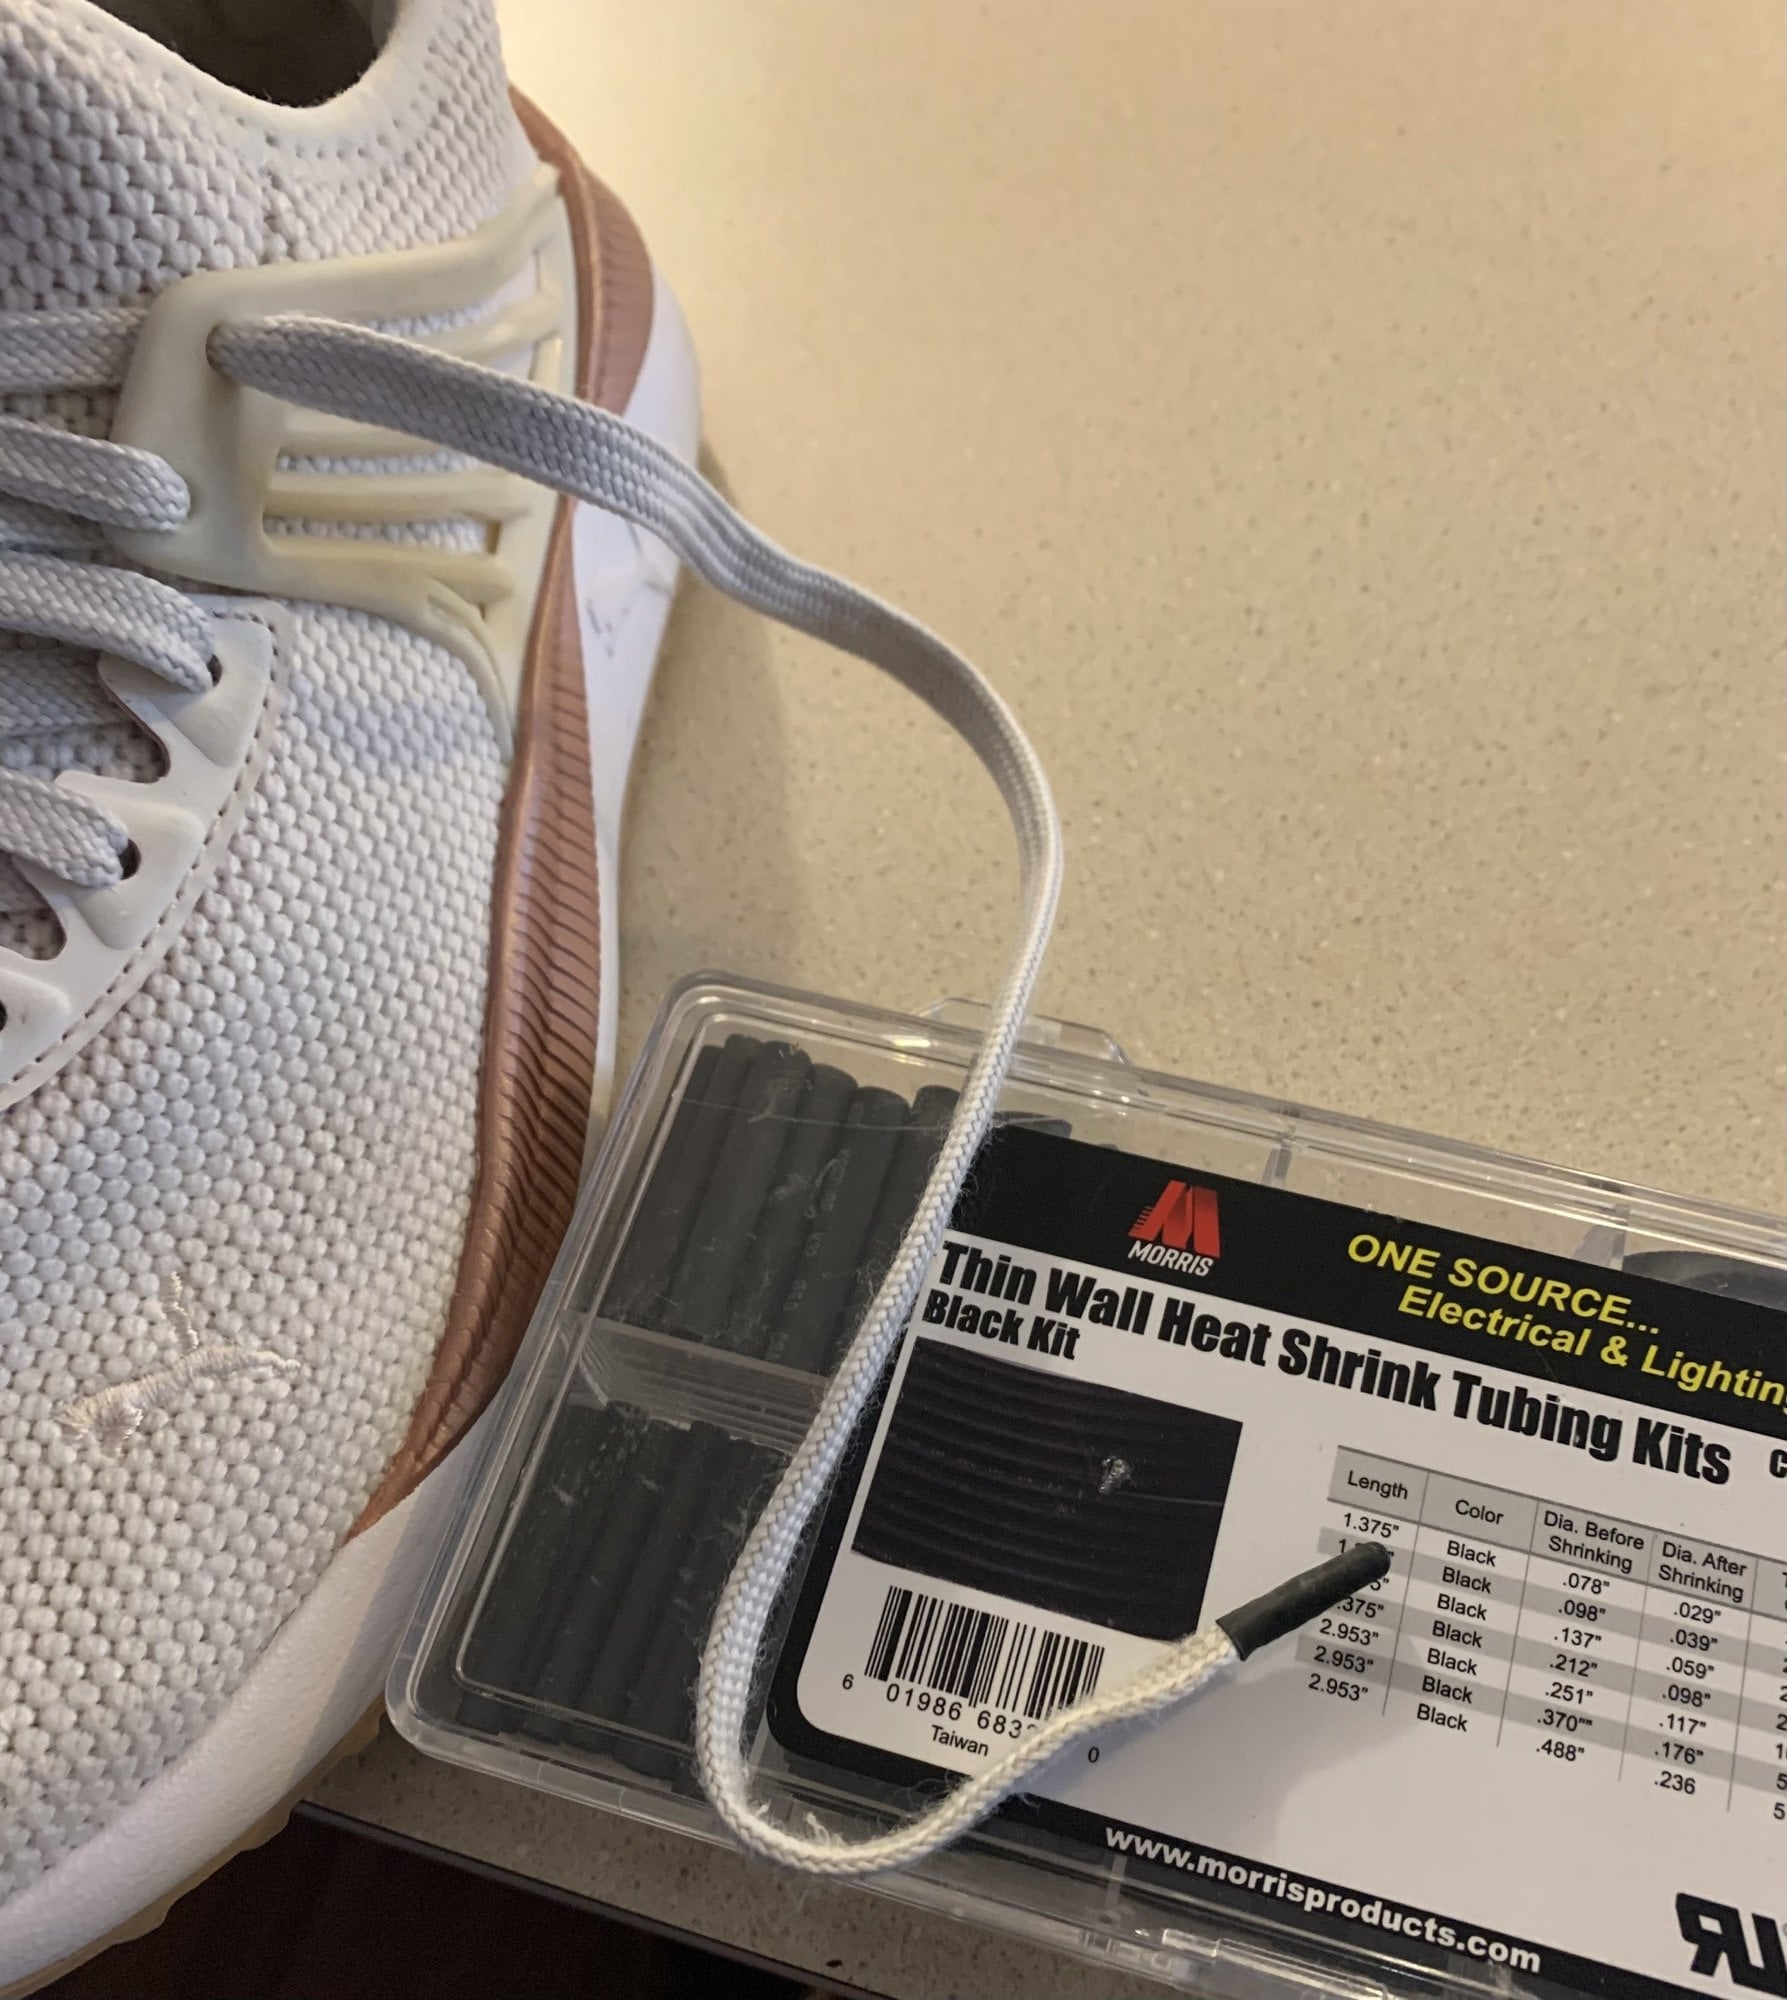
 You can also keep things simple and replicate the plastic aglet appearance common to most shoelaces, for example, by buying clear or colored heat-shrink tubing to mimic that fresh-out-of-the-factory appearance. (These are also great for fixing laces in general, replacing stepped-on ends that have broken over time.) Alternatively, you can lean into newness with shiny, brushed, or matte metal aglets in hues like bronze, gold, silver, or black, and with various finishes and shapes — rounded, cylindrical, textured, the list goes on.
 Metal aglets are generally designed to be more durable than plastic; and while they would ordinarily still be susceptible to scratching or tarnishing on the surface, lace locks tend to keep the snipped tips up in the air perpetually, sparing them from scraping along the ground. Some are made to be slotted into place, self-clamping without extra tools; others require a small included screwdriver and screws that lock them in position; while still others enable (or force, depending on your point of view) you to literally crimp your own style.
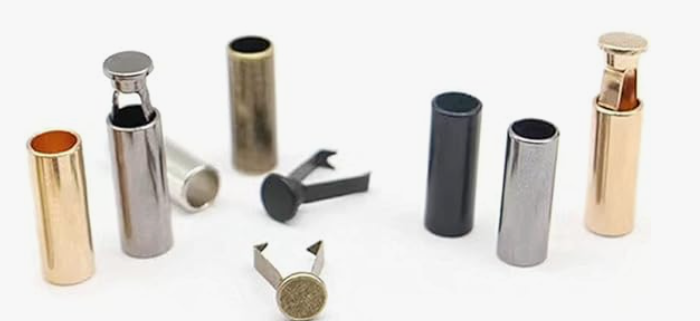
The locks themselves are rather less exciting by comparison. Aside from selecting a color that suits your shoes or your style, my main advice is to pick something with a larger button surface, making it easier to depress one-handed with your thumb.
 The major prefab kits offer useful examples of various common button shapes. In addition to their conspicuous branding, Lock Lace sets require you to push a smaller ridged button area, which I found awkward and uncomfortable. RJ Sport makes both branded and brand-free locks in tons of colors, with a smooth round button to boot. Those are what I use, but there are other options – UpUGo has a sort of textured “U” shape with a similarly sizable surface area, for example. There are also inexpensive bulk lock sets with various shapes and sizes, in case you want to try out different options.
Lace Locking Pro Tips: Closing Loops & Severing Ties
To keep things clean, simple, and familiar, I started out with traditional and subtle options – heat-shrink plastic tips and generic logo-free black locks. I’ve since experimented with some other solutions, however, and have a few tips to share that might help you avoid frustration.
 Locking & Clipping Tips: be sure to slot the laces through your lock of choice before clipping the ends, which helps in multiple ways. It lets you confirm an ideal length before you clip the lace and can’t go back – I suggest letting the laces fall to the floor and cutting the ends about an inch and a half up from there. Also, if you happen to choose an aglet that is a bit larger, it might not pass through the slots in the lock after it’s installed (and the last thing you want is to be futzing with fraying ends while you slide the laces in).
 Lace Tips: If you choose to go with the classic plastic look, the tubing is about twice the diameter before it is heated than after. So don’t be alarmed if it looks bigger than you think it should at the outset. I’m sure OSHA would take issue with this, but rather than seeking out a hair dryer or something else to heat the tubing, I simply ran a lighter back and forth below it after clamping the lace in place.
 Hot Tips: That’s right: for no particular reason, I decided to perform my first do-it-yourself surgical shoelace experiment not only with an improper tool but also on my own, sans assistance … which brings me to a last tidbit of advice for this section:
Finger Tips: do as I say, not as I do, and tap a two-handed friend, partner, or family member … heck, even a total stranger on the street to help you out with stuff like this. Doing so will save you time, stress, and potentially even serious injury. Being down to just one healthy hand, I’ve become increasingly self-conscious about putting that miraculously functional five-fingered extremity at risk. I can’t speak to where your line should be, but when it comes to safety: you have to put your foot down somewhere, so try to tread carefully.

Good & Fast: Assistive Shoes, Never Worn
Purpose-built assistive footwear needs to help users slip shoes on and off with ease, either with one hand or no hands, while also providing a secure fit that won’t slide around. There are lace-free, slip-on options, but for a lot of laced shoes, balancing those demands is no mean feet feat. As a kid, I was chastised by parents for rushing to cram on and yank off loosely tied shoes rather than simply untying and retying them. As an adult, I understand that was hell on heels, and dangerous to boot. But lately, in researching recent adaptive designs, I’ve found pairs that manage to be fun and flexible but also safe and snug — in some, you can even stomp on the heels with carefree abandon.
 Zeba hands-free, slip-on sneakers, for instance, feature a collapsible heel so you can slide them on or off without bending down, providing adaptive benefits to a wider range of users. Their pairs generally stand closer to the comfortable and casual end of the style spectrum with mid-tier pricing. Kizik employs a similarly heel-centric design (though with a broader focus on more elastic materials all around). Their pairs land in a similar price range, with relaxed, active, and outdoorsy options – though their soles skew a bit bulkier.
 Billy Footwear designs shoes with wraparound zippers that open up large ankle apertures, simplifying entry for those with limited dexterity. Many of their shoes are AFO (ankle-foot orthoses) friendly, designed to accommodate lower leg braces. The zippers are helpful for one-handed operation, regardless, though their high visibility males them de facto fashion statements, for better or worse.

Nike’s Easy On, FlyEase, Flex Advance, and other adaptive series have tread along various paths that have been worn in (before or since) by other brands. Some of their shoes have wraparound zippers like Billy; others have collapsible heels like Zeba and Kizik; still others use feature larger openings with straps for easy entry. In typical Nike fashion, even their accessible designs tend to skew athletic in appearance, and you pay a premium for the brand name as well.
 Nike has laudably taken a lot of shots on inclusive goals over the years, and iterated on what works while letting go of what doesn’t. I’m particularly enamored with some newer FlyEase “Go” pairs. This traction-gaining line incorporates a rather ingenious (vertical) dimension. As the company explains it: “Nike Go FlyEase works because the tensioner band and bi-stable hinge hold the shoe in a steady open position. Step down on the ‘diving board’ to click into lock position—ooh! Pop back up by stepping on the ‘kickstand’ on the heel—ahh!”
 Basically, the center of each shoe pops up to let you out, leaving the front in the back to slope down toward the heel and toe. When you step into them, each shoe flattens out again, folding in over your feet. There’s something appealingly direct about the connection of form and function — It’s evident even upon a brief inspection how the mechanism works, at least in general terms. Users can even pop them on and off without bending over.
Retreading the Idea of Adaptive Designs
 In a world that could use a lot more attention to adaptive apparel in general, I’ve been pleasantly surprised to discover a wide (and growing!) range of even more broadly inclusive footwear. I’m also still adapting the shoes I have underfoot to fit my style, comfort, and abilities. But as my shoe collection inevitably requires replenishment, I’ll be looking more toward adaptive pairs for new purchases.
 As with many post-injury choices impacting my everyday life, there have been substantial elements of triage and timing. Lace locking offers a great quick fix for immediate needs. Then, with somewhat more time to research (and to better understand one’s post-injury status), other more sophisticated solutions may grow more attractive; conversely, for someone on a road to complete recovery, they may prove unnecessary. Even for those of us with long-haul injuries, whether or not significant improvement is expected, things will still change over time. All of which is to say that, like anything in life, it’s best to revisit (dis)abilities and possibilities periodically. Meanwhile: if the shoe fits, wear it.
Update: Turning On My Heel to (FlyEase) Go
 As I was wrapping up edits after writing the above, I took one last step and purchased a pair of adaptive shoes. I wasn’t seeking them out for myself, but as I was researching this piece, I found and bought a pair of Nike Go FlyEase that were on sale. And I have to say: I’m impressed. I still have no intention of ditching my other shoes, but I am keeping these and adding them into my rotation. Now that I have some first-foot experience, I also have some additional observations to share about this design

After getting into and out of them a number of times, I would say these Go FlyEase shoes feel like having easy-access slip-ons nested within comfortably snug sneakers. The inner liner (slip-on) portion angles up to meet your foot so you can slide into it with ease. Then, you simply put your weight down to snap it into place, and voila: you’re wearing a shoe. When taking them off, the angled back of each heel acts as a kind of quick-release lever so you can use one foot to help the other slide back out. This action also pops the shoe interiors back into their angled starting positions, making the pair easy to put back on again next time. The entire process forms a neat and complete little circle, thoughtfully designed and executed.

Notably, at no point along the way do you actually have to bend over and handle the shoes directly. And once they’re on, those easy-on-and-off features fade to the background from a user experience perspective – I haven’t gotten any sense that they could slide off easily by accident, for example. And while I wouldn’t have necessarily picked a low top style for myself at the outset, I have to admit I’ve grown to like the look and feel of this pair – in part because you can see how the structural details (form) reflect the accessibility (function) of this shoe design.

So, in the end, I tried on footwear from each pair of cheap, fast, and good options. And while I replaced no-tie kit elements from the first round, I retain shoes embodying the second and third solution types — DIY modifications of laced pairs I owned plus new assistive shoes. This new balance works for me, but your mileage may vary.
Adapt or Design — A Project of 99% Invisible

Comments (3)
Share
Universal application to mobility issues and I enjoy the puns My Mom had elastic laces. Many older people have trouble with shoes. I am blessed to be able to bend, but my faces don’t stayed tied. Can wait for the next reveal.
In my exercise class today, I found 8 people wearing alternative footwear to class. This article can be relevant to people who have had joints replaced or other mobility issues. It is well written.
It can help the physical therapist profession c
to think outside the box. Consider potential audience members.
Did you try Zubits?